This article gives an overview about designing Cognito forms templates suitable for import into your Influence database. It is designed to cover the way to 'Tag' forms suitable for import into Influence and is not designed to be a complete Guide to the Cognito Forms software. For that please refer to Cognito's own documentation.
Contents (Click an item to Jump to that section)
Overview
Videos - Demonstrations & Guides
Example Forms
Setup
Types of Data
Importing the Resource Form into Cognito (example template)
Copying a Form in Cognito
Form Design Guidelines
Fields to Edit in the Resource Form
Role Codes
Forename/Surname
Date of Birth
Personal Details
Payroll Details
Proof of ID & Security Info
Photo
Attributes/Skills
Documents
Compliance Items
Work History
References
Policy Management (Opt in/Out)
Adding a NEW Field to your Application Form
Setting the Submission Details for a Form
Overview
This article is intended to help users to design a suitable form within their CoGnito forms account to allow the submission of candidate applications. These applications can then be automatically loaded into the Influence database.
If you have not signed up to Cognito forms, do so using the Link Below.
| NOTE: The Cognito Forms FREE account will NOT work with Influence integration as it does not allow use of the relevant calculated fields, etc. You should choose a TEAMS (or higher) subscription plan. |
|
IMPORTANT: This article is *NOT* meant to be a complete Form Design guide or to cover all the features that can be included on a Cognito form- for that please consult the Cognito Forms documentation (https://www.cognitoforms.com/support). It is designed to illustrate some specific information about how to setup particular fields to integrate with Influence so that they can be imported into your database. |
ALSO:
In order to work with Cognito forms, your Influence database must be version 1.00.20.155 (or later). We recommend that you update to the very latest release/version as features are added or refined on a continuous basis. Please contact us to arrange an update.
For information specific to designing a form to update the details of an existing candidate you may wish to refer to this article as well.
COGNITO FORMS - UPDATE CANDIDATES - Click to open article
| IMPORTANT - IF you intend to import and compliance information from these forms you must make sure that the compliance item in Influence it ticked to allow import otherwise they WILL NOT WORK - see the relevant section from more info |
Videos
Below is a list of videos which are referenced in this article. You can click on any of the links to view the relevant video.
VIDEO: Getting Started [Created by Cognito]
VIDEO: How to Share a Template [Created by Cognito]
VIDEO: How to Copy Fields [Created by Cognito]
VIDEO: How to Capture Attributes on Your Form
VIDEO: How to Add a New Calculation Field to your Form (This Video has been removed - May be replaced with an updated version in future.)
VIDEO: How to Change the Submission Settings for your Form
| When designing your own forms we strongly recommend you watch these videos to help. |
Example Templates
Below are links to example Template Forms. We suggest that you import these into your own Cognito account, then adapt these to suit.
| FORM |
Link |
Description |
|---|---|---|
| Candidate Basic Application Form |
https://tinyurl.com/h6askdn6 |
A simple form designed to capture basic candidate info (Name, email, phone) prior to sending a full registration form. |
| Candidate Registration Form |
https://tinyurl.com/3m5h6r5z |
A form designed to collect detail for new candidates. |
| Availability Form * |
https://tinyurl.com/2p8j4h47 |
An example form to collect candidate availability for existing workers. |
| Candidate Reference Request Form * |
https://tinyurl.com/yckn3wvn |
A form to send to candidates to request details of referees. |
| Referee Form * |
https://tinyurl.com/2p8aw3je |
A form to send to referees to provide details about applicants/candidates. |
| Update Bank Details Form * |
https://tinyurl.com/2p9x2bkp |
A form to send to candidates for them to update their bank details. |
| Update XXXX Form * |
https://tinyurl.com/55wyddcs |
A generic form for Updating an existing candidate - just add the specific info that you want to add after the first section. |
| NB: Items marked * are designed to update existing records; applicants will need to fill the form with their Forename, Surname, Reference No. and either Email or Mobile No.in order for the form to update the correct record when imported. These 'update Forms' also contain an example of a Merge Field that can be used on the email template in Influence to Pre-Fill the form with these details. |
Before you start designing your own form, we recommend that you import these examples into your Cognito account and use this as a starting point. (Click the "Importing the Resource Form into Cognito" below for instructions on how to do this.)
| IMPORTANT: If you do use these forms remember to change the submission settings in the form to send the form you yourself. |
SETUP
In order to use the Web Form submission system you will need a licence, and will also need some parameters to be set within your Influence database. These parameters are described below.
| Parameter set: FORMS |
||
| Flag(1) |
Set to "C" for Cognito Forms |
|
| Flag(2) |
Tick this to insert a link to the form submission into the 'Social Network 2' field of the candidate record |
|
| Flag(3) |
Do attributes use LEVEL or WEIGHT (normally set to L) |
|
| Flag(4) |
Should attributes be imported as ticked (normally ticked) |
|
| Paths(1) Notification email |
User this to set the email address from which notifications will be treated as Forms - usually notifications@cognitoforms.com |
|
| Text(1) |
Used to indicate the Subject for Candidate Registration emails (usually set to "Candidate Registration" ) but can be changed within the Cognito Form.
|
|
| Text(7) |
Enquiry Source code used to indicate "Web Submission" (This is normally set to WF, and WF should be added to the Cand Enq Source [913] Code Table |
|
| Parameter Set: WEB |
|
| Flag(8) |
Are Forename/Surname capitalised when imported from Web Forms? |
| Flag(9) |
Are Addresses capitalised when imported from Web Forms? |
| Flag(10) |
When importing CV's should the system scan them for Attributes? (In addition to importing any attributes submitted as part of the Web Form) |
| Text(14) |
This specifies the STATUS which will be used when the new candidate record is created. (The default is WWW) |
| Important: When manually importing form submissions by dragging/dropping them onto the workbench it is important that the first few characters of the SUBJECT on the emails matches the TEXT specified in parameter FORMS,Text(1) otherwise the email will not be recognised as a form submission and the import will fail. |
*FORMS, Text(1) : When setting this you should set this to contain the 'leading' characters of the notification emails you will received.
Example: FORMS, Text(1) = Candidate Registration
Any email where the subject starts with Candidate Registration, which has been received from notifications@cognitoforms.com (FORMS, Path(1)) will be treated as a Web Form Application when dragged/dropped into the sy
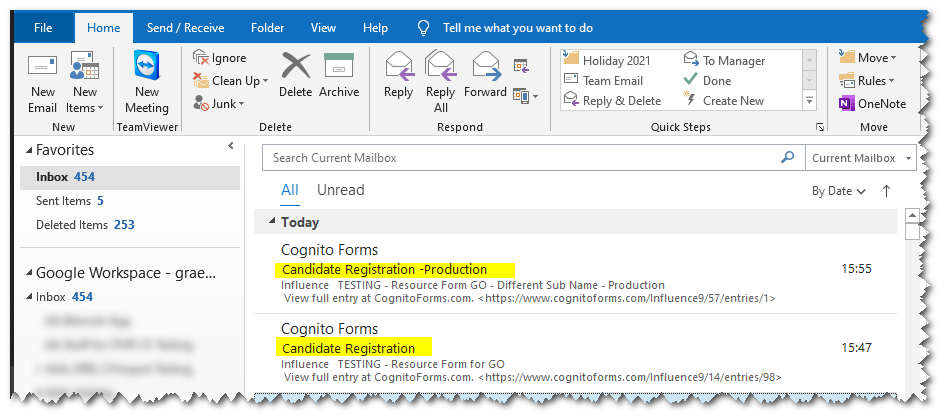
In the example above, both the emails will be imported as a FORM.
TYPES OF DATA
Within your Influence database the Candidate Web Form Tool imports the submitted forms and uses the completed data and any attached documents to do some or all of the following:-
| Create and Populate Candidate records |
Forename, Surname, email, etc. |
| Import and Process the candidate CV |
Will scan the CV to find Keywords |
| Import selected Attributes |
Skills for the Candidate |
| Import and store Specific candidate docs |
e.g. Any seen on the [Docs] tab |
| Manage their Compliance Data |
e.g. Driving License and Expiry date |
| Manage their Compliance Documents |
e.g. Scanned copy of Driving License |
| Manage Policy Opting |
e.g. Privacy Policy opt In or Out |
| Import Company Trade Details |
e.g. Company Name for Ltd Co workers |
| Import Candidate Photo/Picture |
|
| Work History |
e.g. Previous Employer & From/To Date |
| Referees |
e.g. Name, Tel, email & Type of referee |
Importing the Resource Form to your Cognito account
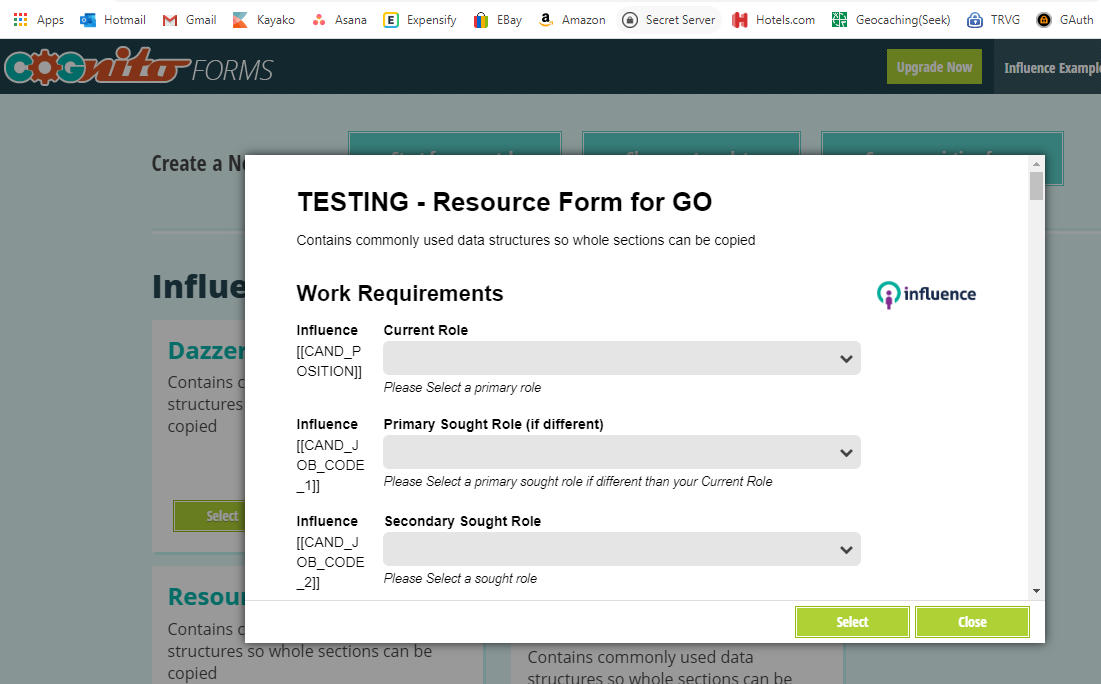
We have created a Resource Form which contains examples of all the types of information that can be captured and imported using a form and can be used as a staring point for creating your own Application Form. Unwanted fields or sections can easily be deleted from the form.
If you wish to add additional fields to the form, then the existing items can be used as guidance to help with the creation of similar fields.
VIDEO: You may wish to watch the video from Cognito Forms which explains about sharing and importing Templates. How to Share a Template
Essentially the process is:
i) Click on the link to the resource form which you will be sent.
ii) When prompted choose [Select] then click [SAVE] to save the template into your account.
Making a Copy of a Form to use as your Application Form
Having imported the Resource Form into your Cognito account, you can create a COPY very easily. You may wish to watch the video from Cognito Forms will show you how to create a COPY of a Form/Template. How to Copy a Template Form
| NOTE: We strongly recommend that you make a COPY of the Resource Form, and then edit that copy to create your own Application Form. That way you always have a 'safe' version to go back to for reference should you accidentally make any unwanted changes to your copy. |
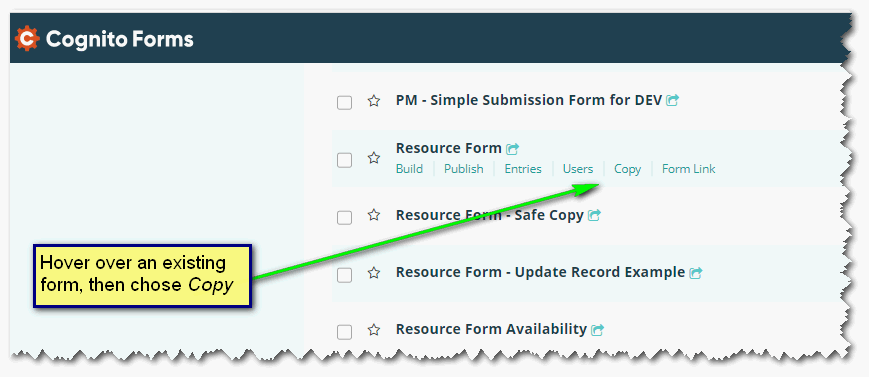
Essentially the process is:
Find an existing form and hover the cursor over the form name.
Choose 'Copy' from the sub-menu that appears.
Having created your own copy of the Form, you can then start to edit your version to match your own system and add the fields and documents you wish to capture and adjust amend the roles or skills which exist within your own Influence database.
Form Design Guidelines
Below are some useful guidelines about how to design your form. We recommend that you start with our Resource Form template. Having imported the template into your CoGnito account we suggest you make a copy of the form and call this Application Form, and then begin to edit the copy. Certain fields will need to be edited to match the entries and codes within your Influence database.
Each item you wish to import from your Application Form is made up of two elements:-
A Calculation field Used to tell the system where to store the data within your Influence database.
A Data field used to capture the actual data entered into the form.
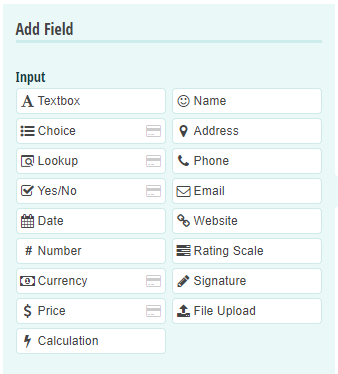
There are several types of Data field which can be chosen when building your Form.
| For more information about each Data field and how it works, please consult the Cognito Forms documentation. |
Calculation Fields
Within your Cognito Form Calculation fields are used as the method to indicate to influence what data the following field contains. Whenever you are designing or editing a form a Calculation Type field marked as [Internal] needs to precede every field that you wish to be imported into your database. It must be a Calculation field with the Type set as Text.
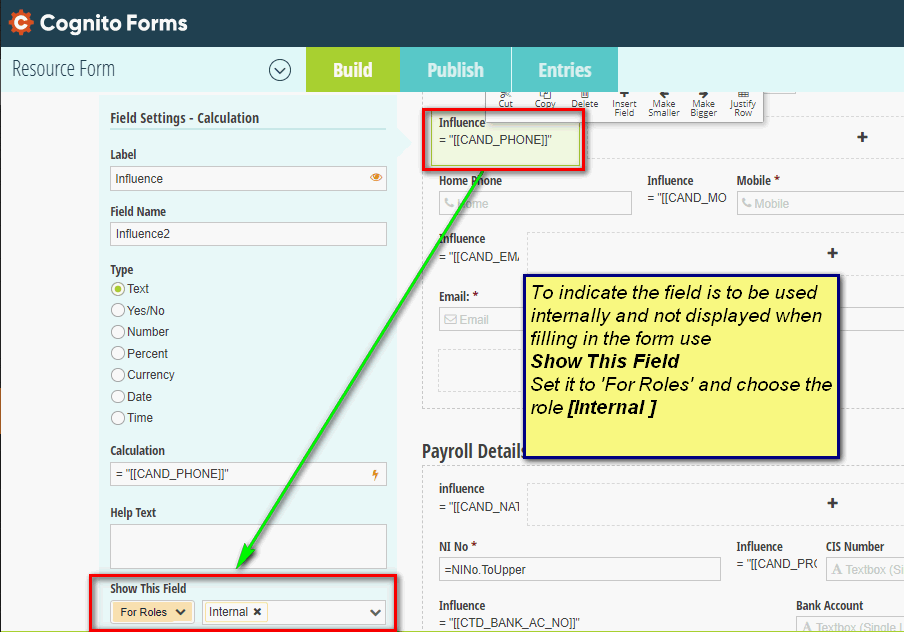
In the example above you can see a calculation field containing the calculation
="[[CAND_PHONE]]"
These calculation fields should be set to Show For Roles and has the role Internal
| REMEMBER: When adding the calculation field make sure it is a Calculation field with the Type set as Text. |
Data Fields
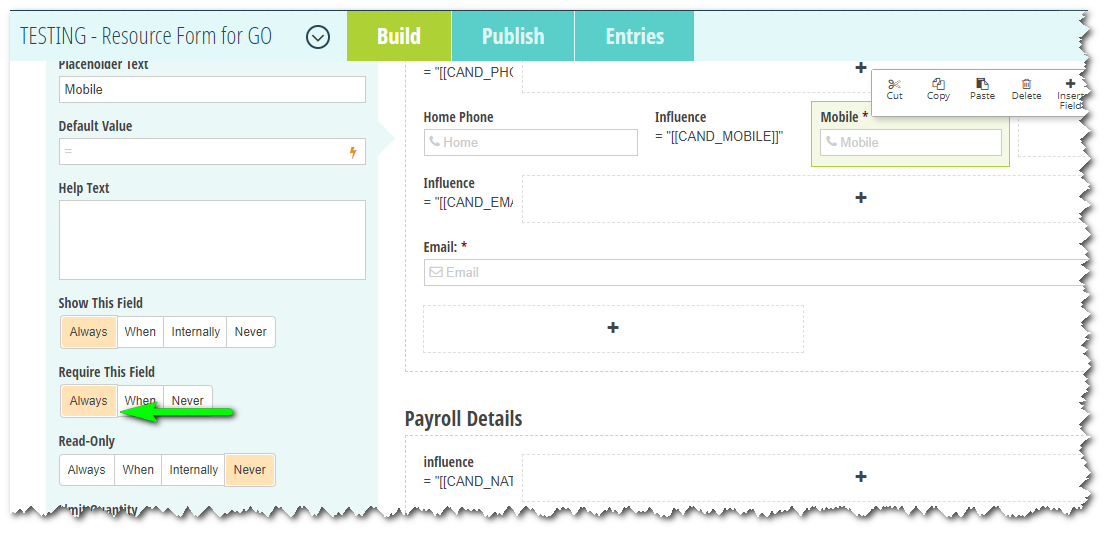
Within your Cognito Form you can select any of the available data field types to capture the information on your Application Form which you wish to import into your database.
It is simply a case of choosing the right type of Data field to capture the information you need.

In the example above you can see a Data field labelled Mobile. It is a Phone type field within Cognito forms and allows applicants to enter telephone numbers.
| Note: It is possible to make data fields mandatory on the form by settingRequire This Field to Always |
Copying Fields
Having made a copy of the Resource Form to use as your Application form, you may wish to copy or repeat fields within the form. Copying a field is very simple.
Essentially the steps are:
i) Select the field you wish to copy, and choose COPY from the toolbar.
ii) Click on the [ + ] in the form where you wish to add your field, and choose PASTE
VIDEO: There is a video showing how to copy fields on your Application form available HERE
Fields you may wish to Edit in the Resource Form
The Resource Form provides a good starting point for making your own Application Form. However some of the Data fields within the form will need to be amended to match your particular Influence database and these are described below.
ROLE CODES
The Resource form contains a section relating to ROLE CODES. These use a Choice field to provide the selection of roles for the applicant.
Calculation Field(s)
="[[CAND_POSITION]]" for the Current Position <OR>
="[[CAND_JOB_CODE_X]]" for each of the 10 'Sought' Roles (replace X with 1-10)
Data Field
This needs to be a Choice Type field. When setting the choices they need to match the Description of the Roles within your Influence Database. (See below)
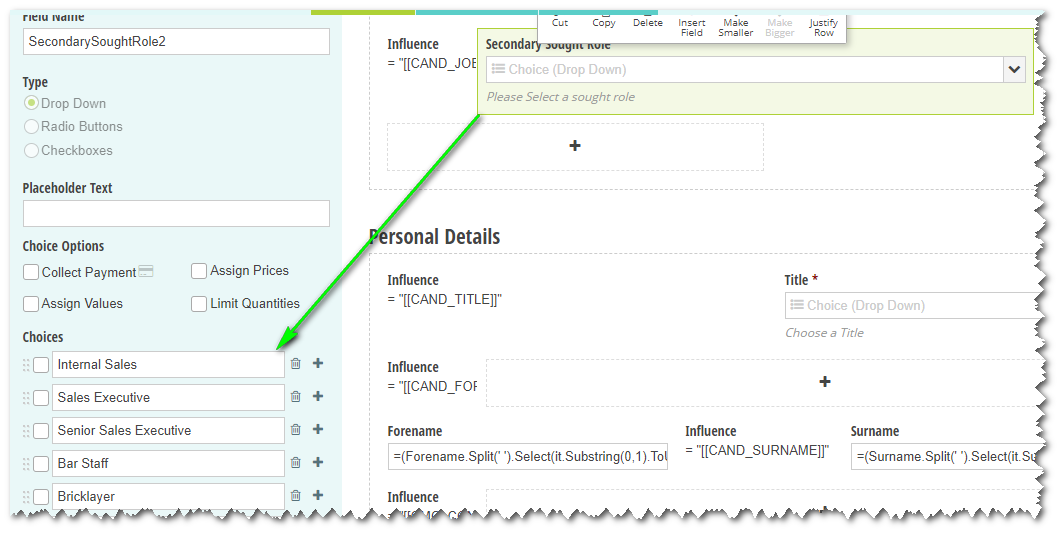
Extra choices can be added by Clicking the + and unwanted choices removed with the bin.
You can watch a video here for an example of setting the ROLE CODES.
Forename and Surname
The Personal Details section of the Resource Form contains various fields such as Title, Forename, Surname, etc. These are uploaded into the Influence database when the application is imported.
| Note: The Forename/Surname have been specially coded in the example Resource form to Capitalise and split correctly and we do not advise playing with these settings. |
Calculation Field(s)
="[[CAND_FORENAME]]" for the Candidate Forename
="[[CAND_SURNAME]]" for the Candidate Surname
Data Field
The field type for these is a TextBox - The Forename/Surname text boxes have been specially configured to split the name correctly, etc.
Date of Birth
This allows applicants to upload their date of birth. This uses a Choice field to provide the selection of roles for the applicant.
Calculation Field(s)
="[[CAND_DOB]]" for the Candidate Date of Birth
Data Field
The field type for these is a Date field. The field can be made mandatory (if required) by selecting the "Require This field" = Always option.
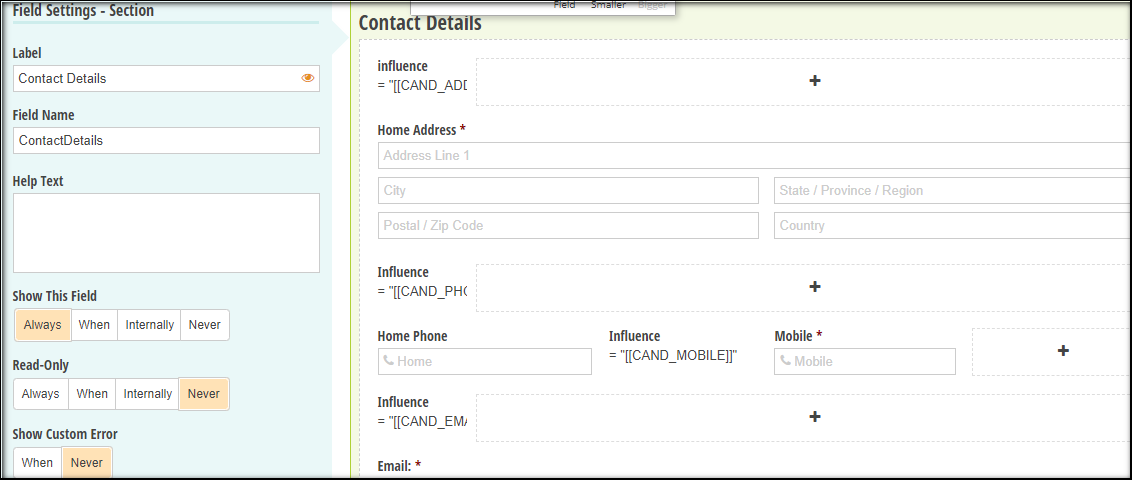
Personal Details
This section allows applicants to upload their address, phone, mobile and email address. These use a variety of data fields on the form.
Calculation Field(s)
="[[CAND_ADDR]]" the Candidate address details
="[[CAND_PHONE]]" the Candidate phone number
="[[CAND_MOBILE]]" the Candidate mobile number
="[[CAND_EMAIL]]" the Candidate email address
Data Field(s)
These use a variety of field types;
Address => Address type field
Telephone/Mobile => Phone type field
Email => Email type field
(See below for example of the [Personal Details] section of the Resource Form.)
Payroll Details
This section lets applicants upload details related to their Nationality, NI Number, Bank Account, etc. This uses Textbox data fields on the form.
| Note: The NI Number field has specially coded in the example Resource form to only accept a valid format of UK National Insurance No. We do not advise playing with these settings. |
Calculation Field(s)
="[[CAND_NAT_INS]]" the Candidate NI Number
="[[CTD_BANK_AC_NO]]" the Candidate bank account No. (* see below)
="[[CAND_PRO_REF]]" A Professional ID No. for the candidate (as seen on the Personal page of their record in Influence)
* You will notice that this calculation field starts differently, and begins "CTD" - This is because the information from this field writes into the Company Trade Details file in Influence rather than the Candidate File.
Data Field(s)
These all use the Textbox field type; for the Bank Sort Code field we suggest using a textbox with a custom input mask, set to ##-##-## to force the correct input.
Proof of ID & Security
| ** IMPORTANT ** If you want to import compliance information from a Form you must amend the compliance item in Influence to indicate that Portal/Form upload is allowed *** (See below) |
This section of the Resource Form is linked to Compliance Items and allows applicants to upload documents, dates and reference numbers. Because each Influence database has their compliance setup differently, you will need to Amend and edit the Calculation fields and possible the Data fields to match your database.
Calculation Field(s)
="[[CMPL_????_QUAL_REF]]" Reference No. for this compliance item
="[[CMPL_????_QUAL_DATE]]" Start date for this compliance item
="[[CMPL_????_EXPIRY_DATE]]" Expiry date for this compliance item
In all cases the ???? should be replaced with the Compliance Code taken from your Influence database (Maintenance > Setup > Compliance Setup)
| Note: Any Compliance item which you wish to import from the Application form needs to be flagged as such within your Influence database. Open the item and tick the option for Portal Form/Doc [ ] - See below |
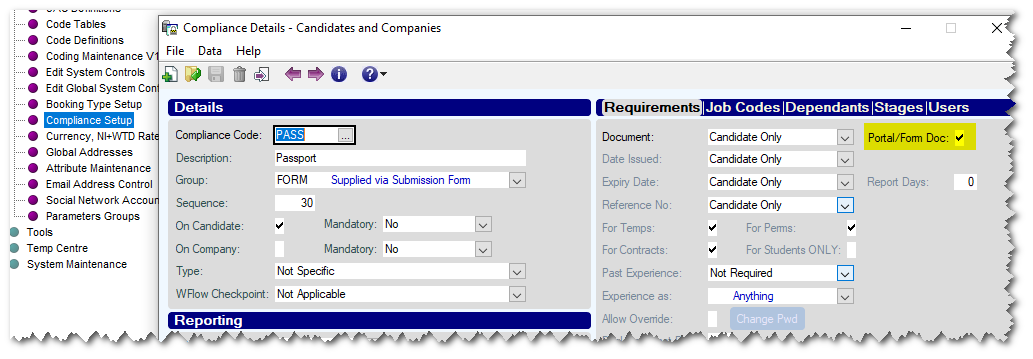
| NB: In later releases of Influence this is no longer a requirement - If the compliance item is on the form it will be imported regardless of these settings. |
Data Field(s)
Reference No's use the Textbox field type;
Start Date/Expiry Date use the Date type fields
Photo
It is possible to allow the user to upload a picture of themselves. This will be stored and displayed on the [Personal] tab of their record within your Influence database.
Calculation Field(s)
="[[DOC_CAND_PHOTO]]" used to indicate a document/file containing the photo
Data Field
You must use a Document Upload field.
When using this type of field on your Cognito form it is possible to restrict the file types which are allowed. In this case you should restrict the types to *.jpg, *.bmp, *.jpeg or *.tif (Other types of images will not be processed or imported into your Influence database)
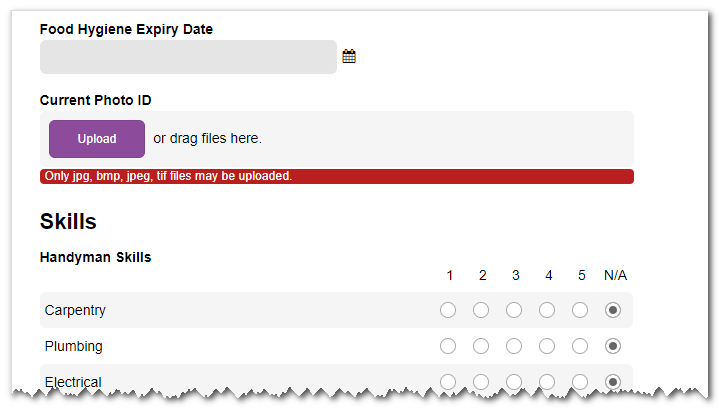
When completing the application form users will be told if they try to upload a dis-allowed file type. (See above)
Attributes (Skills)
As part of the application form it is possible to allow users to select and upload attributes (skills) which match to those stored within your Influence database. As part of the application they can select a level or N/A (not applicable)
In this case the Calculation field will need to be edited to match the Attributes which exist in your Influence database.
Calculation Field(s)
="[[CAND_*ATTRIBS_????,CAND_*ATTRIBS_????]]"
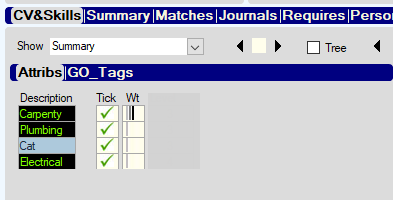
In this case, the calculation field can contain lots of tags for each Attribute you wish to capture. The ???? should be replaced with the Short Code for the Attribute.
You can see the Short codes in your Influence database from Maintenance > Setup > Attribute Maintenance (See Below)
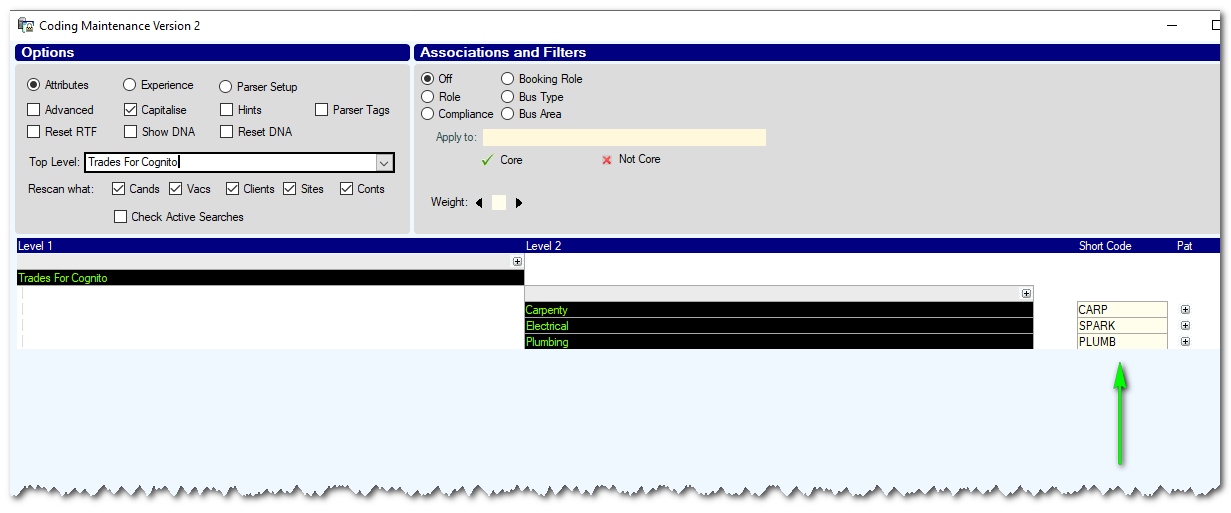
| NOTE: If you are using these Short Codes in an Application form you must make sure that they are Unique and that there are not two Attributes which share the same short code. |
| NOTE 2: It is only possible to import Attributes in this way - if you are using the older KEY CODES method of recording skills the system will need to be converted use Attributes in order to import the data. Please contact us to arrange this conversion. |
Data Field(s)
You should use a Rating Scale type field within your Application Form to capture the Attributes which applicants may posses. If you wish to capture the Weight of the attribute then setup the Rating Scale field to use a Scale of 1 to 5.
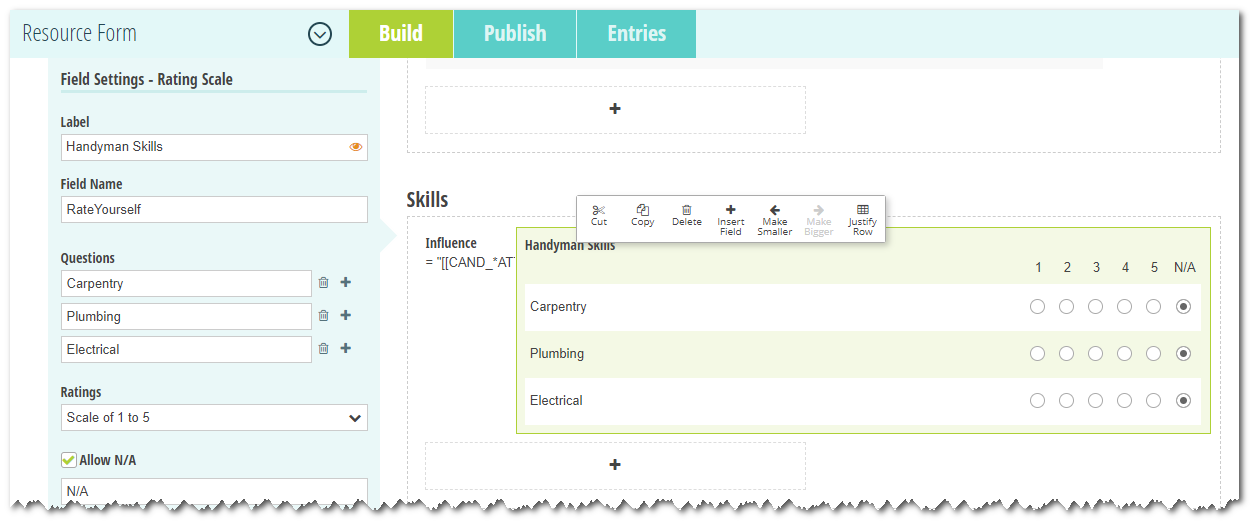
If you simply wish to capture a Tick for the attribute then setup the Rating Scale field to use a Custom Scale with ratings of Yes/No (See below)
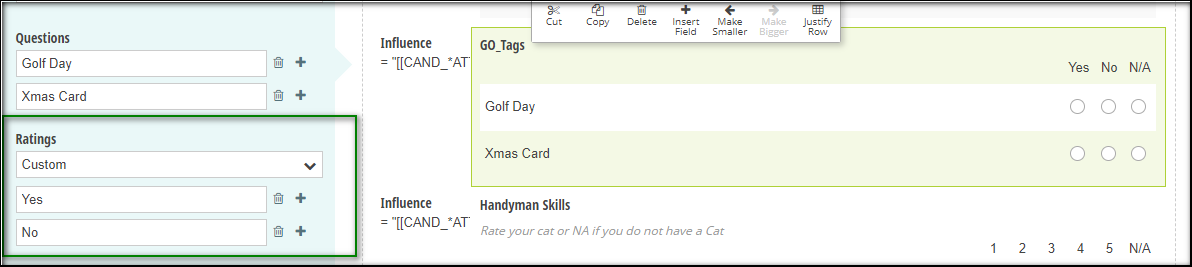
| Important: In either case, the Question section of the Rating Scale must contain the questions you want to ask and must be in the same order as the the Short Codes you entered into the Calculation field. |
Example of a Weighting (Wt) In Influence (See below)
VIDEO: There is a video showing how to capture attributes on your Application form available HERE
Documents (CV, Compliance Items, Candidate Docs)
It is possible to capture documents within the Application Form. These documents can be things such as the applicant CV, Compliance documents or general documents which can be seen on the [Docs] tab of the candidate record in your Influence database.
Calculation Field(s)
="[[DOC_CAND_CV]]" used to indicate a document/file with the applicant CV
="[[DOC_CAND]]" used to indicate a general document/file to store on [Docs] Tab
="[[DOC_CMPL_????]]" used to indicate a document/file linked to a compliance item.
The ???? should be replaced with the relevant code for the compliance item.
Data Field(s)
You must use a File Upload field.
When using this field type you can specify the file_types allowed (e.g *.doc, *.docx, *.pdf) and also the maximum number of files allowed.
Work History
Work History and Previous employment can be captured as part of the on-line Application form. On the Resource Form these fields are inside a Repeating Section which means that applicants can submit these items multiple times to cater for each position they have held historically.
You can find out more about Repeating Sections by consulting the Cognito Forms documentation.
Calculation Field(s)
="[[HIST_EMPLOYER]]" used to record the previous employer name
="[[HIST_START_DATE]]" used to record the previous employment Start Date
="[[HIST_END_DATE]]" used to record the previous employment End Date
="[[HIST_DESC]]" used to record a (brief) description of the previous employment.
="[[HIST_ROLE]]" used to record the ROLE CODE for this employment.
="[[HIST_EXP_CODE]]" used to record the 'Type' of this employment.
Data Field(s)
You should use a combination of
Textbox fields to Record Employer/Description. <and>
Date type fields to start/end dates.
Choice fields for Role Codes
Compliance Items
The Compliance items seen on the [Compliance] tab of the candidate record can be captured as part of your FORM.
As well as uploading documents you can ask applicants to record the Expiry date, reference number and 'Stage' for Compliance items.
="[[DOC_CMPL_????]]" used to indicate a document/file linked to a compliance item.
="[[CMPL_????_QUAL_DATE]]" The start/issue date for the item.
="[[CMPL_????_EXPIRY_DATE]]" The expiry date of the item.
="[[CMPL_????_QUAL_REF]]" The Reference No. of the item.
="[[CMPL_????_STAGE]]" used to capture the 'Stage' for the item. *
="[[CMPL_????_STAGE_DATE]]" The date that this 'Stage' occurred.
The ???? should be replaced with the relevant code for the compliance item, e.g. DBS, DRIV, RTW, etc.
* The STAGE field should be followed by a "Choice Box" in Cognito containing choice which match the description of the stages in Influence in order to capture the data.
References
Usefully it is possible to obtain and import referee details and references as part of the Application form. Once again this is part of a Repeating Section.
You can find out more about Repeating Sections by consulting the Cognito Forms documentation.
Calculation Field(s)
="[[REF_FORENAME]]" used to record the Referee Forename
="[[REF_SURNAME]]" used to record the Referee Surname
="[[REF_ROLE_DESC]]" Used to record ????????
="[[REF_PHONE]]" used for the Referee phone number
="[[REF_EMAIL]]" used for the Referee email address
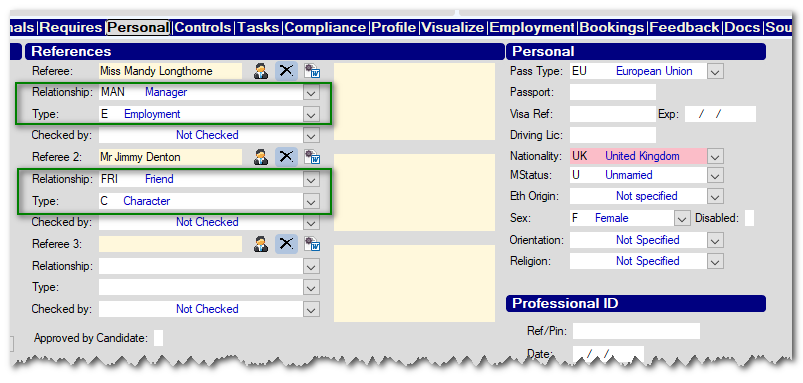
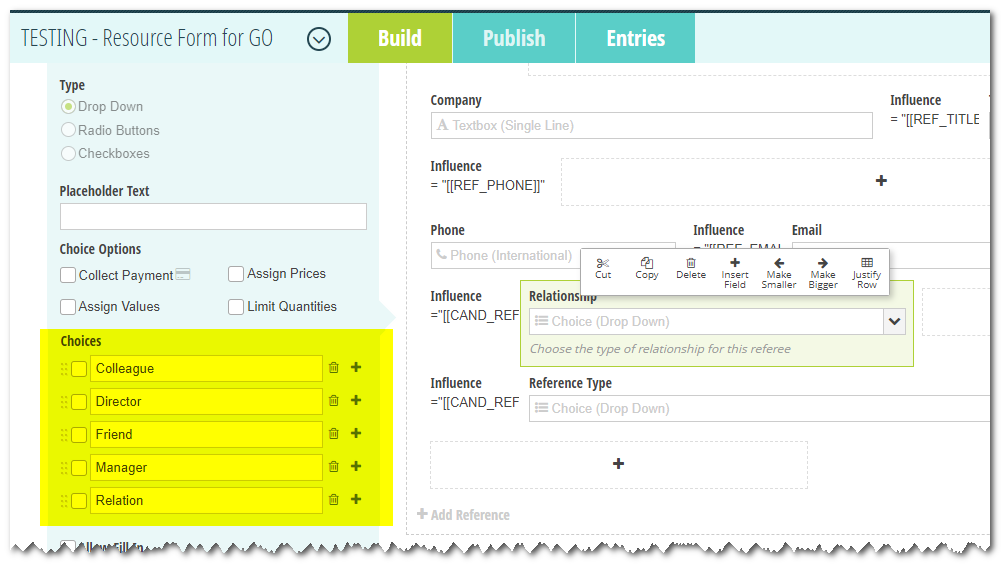
="[[CAND_REF_REL"&ItemNumber&"]]" this captures the Relationship with the Referee as seen on the [Personal] tab of the candidate record in Influence.
="[[CAND_REF_TYPE"&ItemNumber&"]]" this captures the Reference Type as seen on the [Personal] tab of the candidate record in Influence.
(IF not using a repeated section, the reference relationship/type calculation fields will be as follows: ="[[CAND_REF_REL1]]" and ="[[CAND_REF_TYPE1]]" for reference 1. Reference 2 should include ="[[CAND_REF_REL2]]" and ="[[CAND_REF_TYPE2]]" etc... )
In both instances the &ItemNumber& is necessary so that it knows which referee to apply these to, based on the repeating section. (See below for example)
Data Field(s)
You should use a combination of;
Textbox fields to Record Employer/Description
Phone Number fields to store the Referee phone/mobile
Email fields to capture the Referee email address
Choice type fields to capture the Referee Relationship/Type - In these cases the Choices as seen the the left should match the Selections in your Influence database (See below)
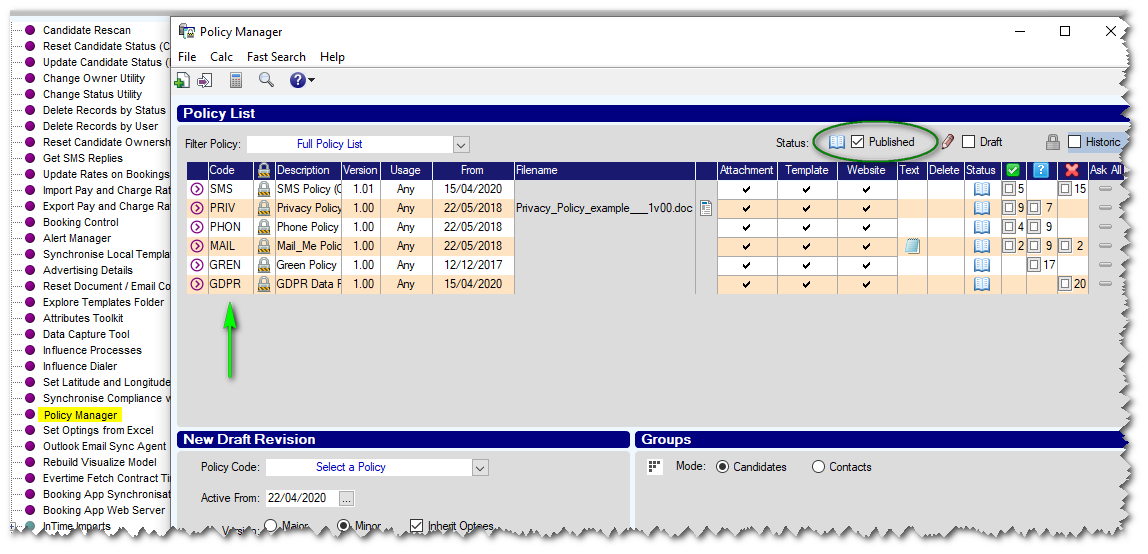
Policy Management
If you are using the Policy Manager within Influence, it is possible to get applicants indicate that they have subscribed to items such as your Privacy policy etc., and bring those responses into your Influence database.
Calculation Field(s)
="[[PM_????]]" used to record if the applicant has subscribed to the policy (or not)
In this case ???? needs to be replaced with the POLICY code from your Influence database, and must be a published policy.
Within your database you can find these codes from Maintenance > Tools > Policy Manager, then filter for only Published policies.
Data Field(s)
You should use a Yes/No field to record the response
(An example is shown below)

Adding a New Field to Your Application Form (That isn't part of the demo Resource Form)
Almost any field which exists as part of the candidate record (and associated Company Trade Details file) in your Influence database can be captured as part of your Application Form. Whilst our Resource Form gives examples of many of the most common, any field can be captured if you know the field name within Influence.
VIDEO: There is a video showing how to Add a New Calculation field to your Application form available HERE
Finding the field name and adding it to your Form can be done as below:
i) Login to your Influence database with the UserID "ADM" and navigate to Maintenance > Database Management > Table Maintenance.
ii) Expand the tables list and find the relevant table (usually Candidates or Company Trade Details) and double-click to see a list of fields.
iii) Scroll down to the relevant field and make a note of the field name.
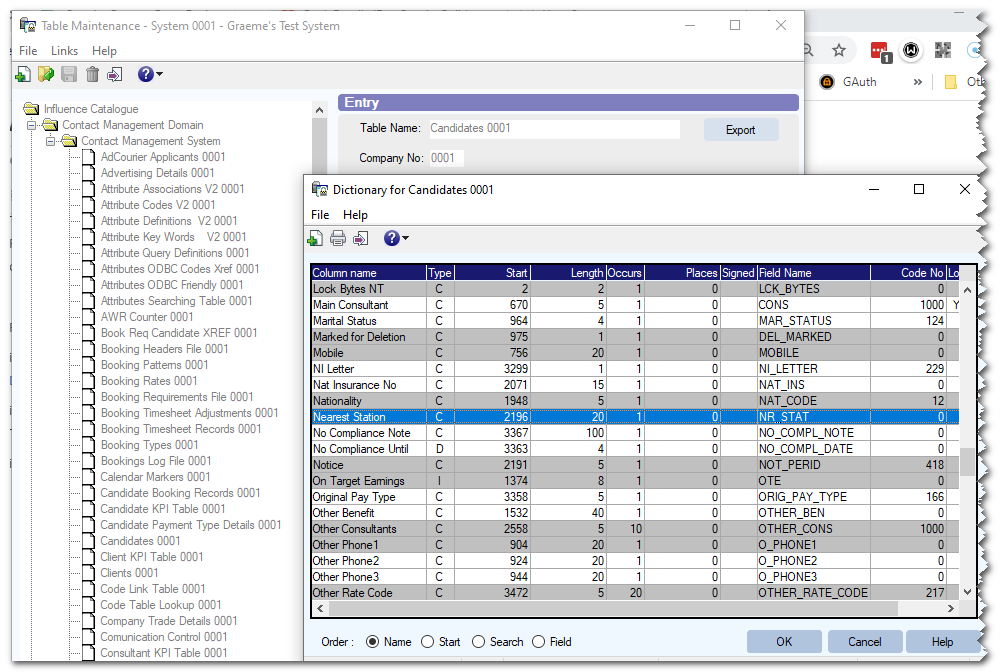
In the example above the field Nearest Station has the field name NR_STAT
Next, open your Application Form within Cognito Forms and proceed to add the calculation field and the relevant Data field.
iv) Within your Form scroll to the section where you wish to add the new field and click the [ + ] to add a new field. Choose the field type as Calculation
v) Set the calculation as ="[[CAND_XXXXXX]]" where XXXXXX should be replaced with the field name you noted earlier.
i.e. ="[[CAND_NR_STAT]]
Remember to Show this Field For Roles and to set the role as Internal.
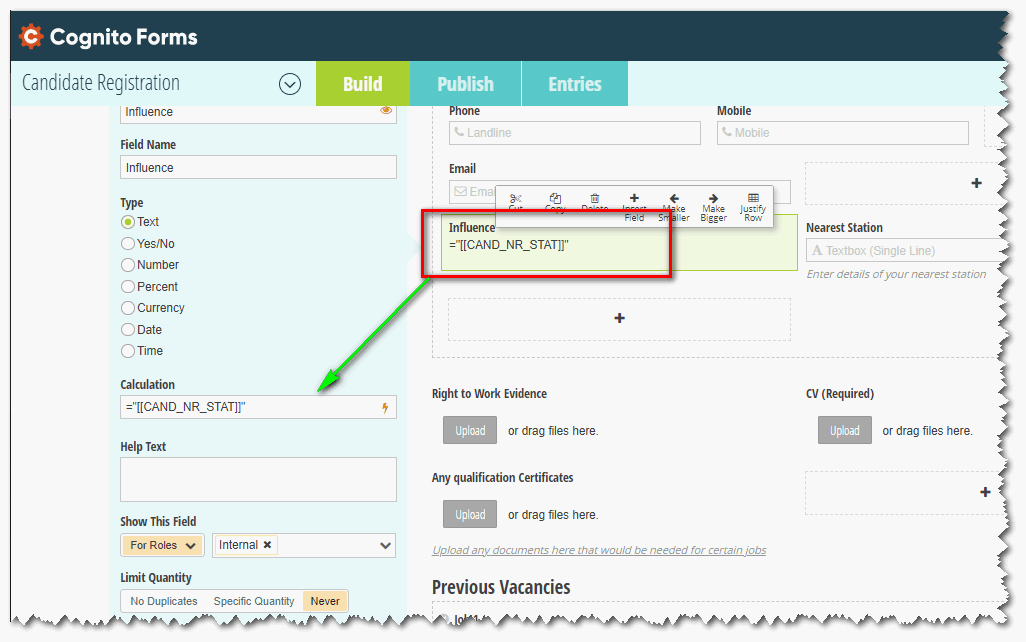
vi) Finally, to capture the actual data, click the [ + ] and add a Data field of the relevant type. (In this case we will use a Textbox type field to capture the nearest station.)
VIDEO: There is a video showing how to Add a New Calculation field to your Application form available HERE
| NOTE: The video above was recoded prior to Cognito introducing Workflows in Sep-2022 so the way that fields are marked as Internal has changed slightly. Please use the info above and mark the field with a ROLE set as Internal. |
Form Submission - Recipients and Subject
| Since Sep-2022 when Cognito introduced Workflows, the method for controlling emails has changed. The information below is based on the new Workflow methods |
Step 1
Go to the bottom of the form and click Workflow. Make sure to turn ON the option for Workflow Link Sharing

Step 2
Click the Submit button at the bottom of the Form.
Find the Send Emails option and click on the email
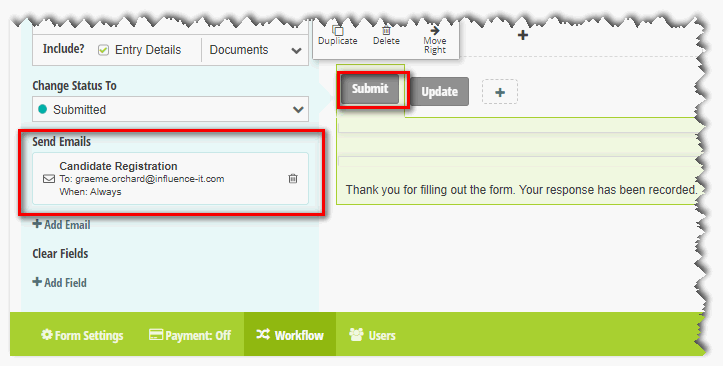
Once the [Email for Submit Action] opens, you will need to make the following checks/changes.
| From: |
Set this to be Cognito Forms / notifications@cognitoforms.com {These settings need to mach whatever has been setup as the 'From' email in your Influence database using parameter FORMS, Paths(1) } |
| To: |
Set this as the email address that you want registration emsils to come to, e.g. applications@yourcompany.com |
| Subject |
Set this to Candidate Registration and use the ROLE drop-down to set the role to Internal { This needs to match whatever has been set as the 'Subject' within your Influence database using parameter FORMS, Text(1) hwhich by default is Candidate Registration} |
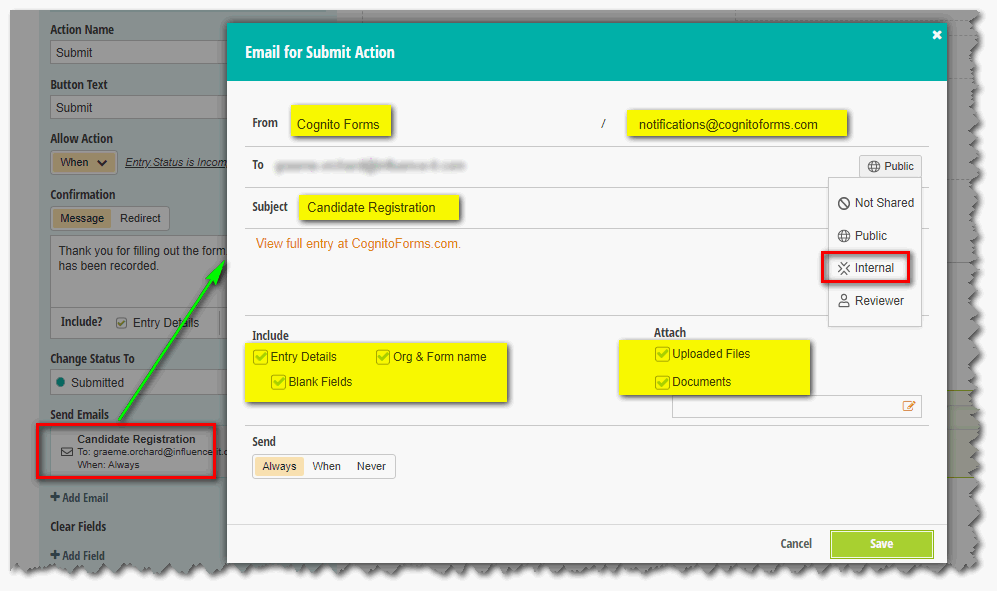
Under the Include section tick all the options. (Entry Details / Org & Form Name / Blank fields). Same for the Attach section. (Uploaded Files / Documents )
Finally click SAVE to store the setup for your [Submit] email.
For more information about submission settings within Cognito, see the Cognito online documentation.
VIDEO: There is a video of the process available showing how to amend the submission settings HERE
Important
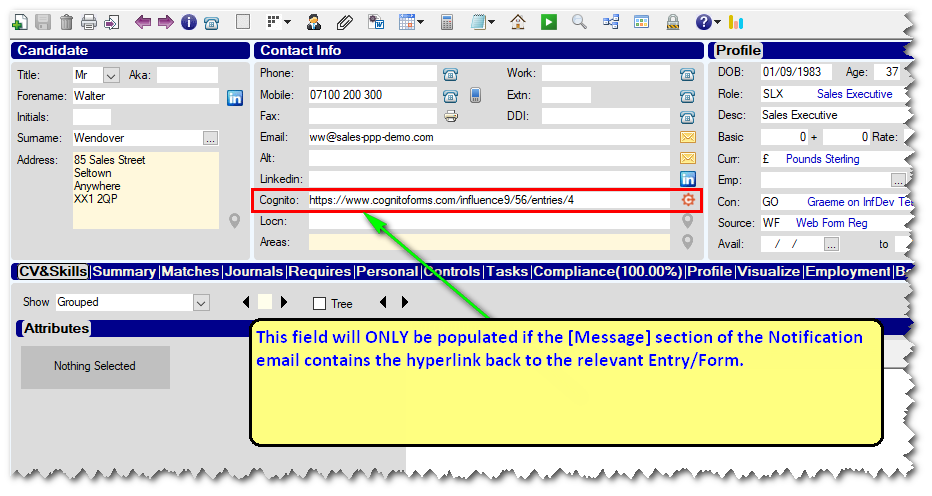
When editing the Submission Email settings you should leave the hyperlink part of the message. It is this that is used by Influence populate the [Social Net 2] field with a link to open the original entry details for this applicant.
See below:
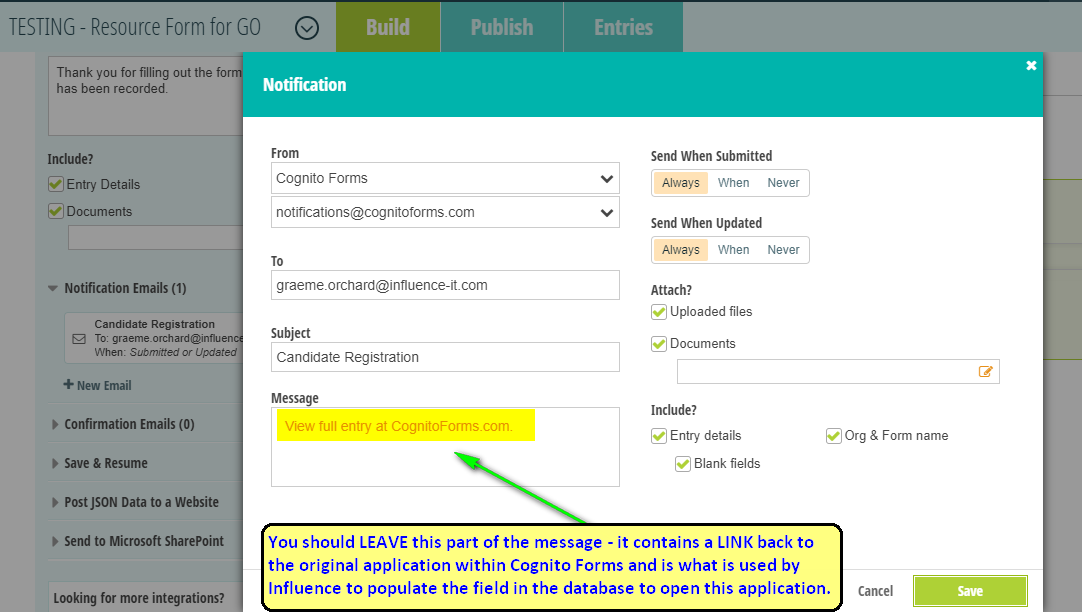
i.e. In the example below, the field is only populated because the Notification email from Cognito contained the relevant hyperlink.
Graeme Orchard
Comments