It is possible to create a new Influence userID very easily in the Influence Database.
This guide explains how to add a new Influence user, and the various options available when you add a new Influence user.
When doing so it is important to ensure that you set the correct permissions/access levels for the users.
- Login as the ADM user (or other user with suitable privileges)
Choose Maintenance > Setup > User Profiles. - Enter a user ID for the new user (e.g. FRSM – Fred Smith) and then press <Tab> on the keyboard, or click […] to choose an existing user if you want to update an existing UserID.
(See the guide below for a quick summary)
Quick Guide
Summary
- Login as a high-priority user (such as ADM), and choose Maintenance>Setup>User Profiles
- Enter the new User_ID into the User ID field, then press <Tab>
- Complete the details on the [General] tab– pay particular attention to Priorities for users.
- Complete details on the Access & Control Page
(Normally we recommend that Edit Templates from Journal Entry = ticked, Edit Codes on the fly = Not Ticked) - Select the Auto Signature page, and either enter the name of the relevant MS Outlook signature, or design/create a signature using the system (right-click to select fields from the user record to add to the signature design)
- When happy with setup, click [APPLY] to save the record.
- Either Enter another User ID to create another user, or press [OK] to save & exit.
Tabs Available
Within the User Profiles option there are several [Tabs] of information which are described below; (Click on a tab name to be taken to more info below)
Tab & Sections Within |
General Overview |
|
General |
This tab has general user information such as name, email, telephone, etc. |
|
Access&Controls |
This tab is used to setup various system privileges such as editing code tables, editing templates, etc. |
|
Auto Signature |
On older systems this can be used to create an email signature. (Newer systems should use Outlook signatures in preference to this Auto Signature which is an older, obsolete method.) |
| SMTP Email |
This tab can hold details of your SMTP (email) server and allows users to send out bulk email shots directly via the email server rather than using the local Outlook email client on the PC. |
|
MS Office & Apps |
This tab holds details of logins/subscriptions to 3rd party services such as SYNETY (phone integration) or Broadbean (Job Posting) as well as the sync settings for transferring tasks and appointments into MS Outlook. |
| Office Settings |
This tab contains details of allowed OFFICES are stored on this tab if using the "Multi-Office" system within Influence. |
General Tab
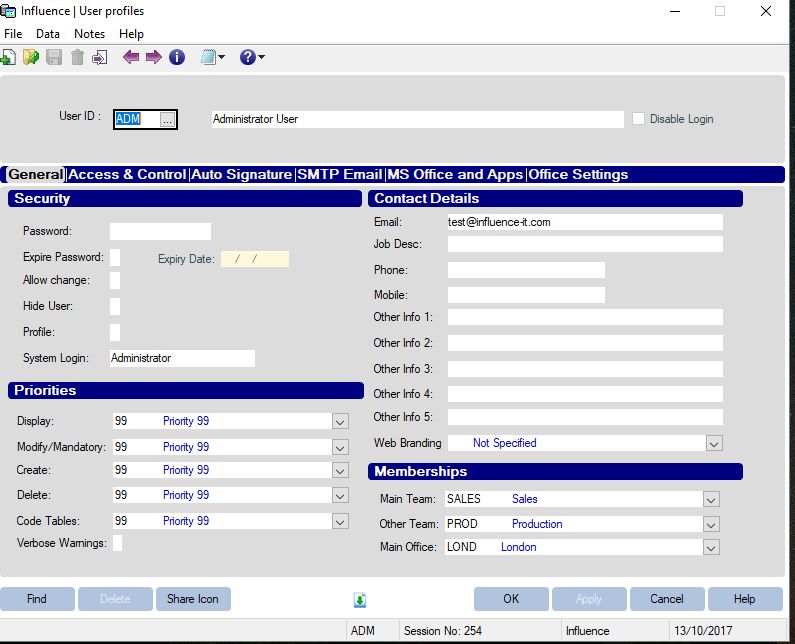
Pic1
Security
Use the settings in here to determine if password expire, what the password is, and to hide users.
| NB: the ‘default’ password is the same as the UserID, e.g. FRSM / FRSM |
| Password |
Set the password to login for this user. |
| Expire Password/Expiry Date |
Does the password expire, and if so what is the Expiry date. |
| Allow Change |
Allow the user change their own password when logging in. |
| Hide User |
Hide this userID from any drop-down lists in the system |
| Profile |
This user record is to be used as a "PROFILE" and is effectively the "Template" that is used when creating new users. |
Contact details
Use this section to set basic contact details such as email, Job Desc, Tel & Mobile. You should also select the correct Main Team using the drop-down menu’s (If necessary other Teams can be added using Setup>codes Tables) Other Info 1-5 can be used for whatever else you like – simply free text fields.
Priorities *
This controls the level of access that a user has to various parts of the system
A Typical example of system priority setup is shown below
These are our typical recommendations, but feel free to vary these or create additional levels or bands as you wish.
| ‘Std’ User (Sometimes '60') |
‘Manager’ |
‘Admin’ / Super User |
|
| Display |
40 (60) |
80 |
99 |
| Modify |
40 (60) |
80 |
99 |
| Create |
40 (60) |
80 |
99 |
| Delete |
00 |
00 |
99 |
| Code Tables |
40 (60) |
80 |
99 |
| Display |
This controls which fields a user can see. It is possible to amend the display priority for an individual field within the system. e.g. You could make the ‘Current Salary’ field at the top right of a candidate display priority ‘70’ which means that ‘Std’ users above would not see this field, but Managers would. |
|
| Modify/Mandatory |
This controls whether a user can amend (modify) the content of a field. Similar to the display example above you can set the modify priority for fields within the system. |
|
| Create |
The creation level |
|
| Delete |
This controls whether users can delete records. Priority 00 prevents deletions Any other priority (10 or higher) allows users to delete records.
|
|
| Code Tables |
The priority here determines if a user can ‘Edit’ records within code tables (the drop-down lists in the system) or not. |
|
| Verbose Warnings |
If this is ticked, then messages about non-completed mandatory fields pop-up in a window, otherwise the message appears at the bottom left of the screen.
|
To find out more about hiding fields or editing screens, please contact Influence and arrange to speak to one of our support team or your Influence consultant to arrange some system administrator training.
Access & Control Tab
This page gives additional control over what features users can access.
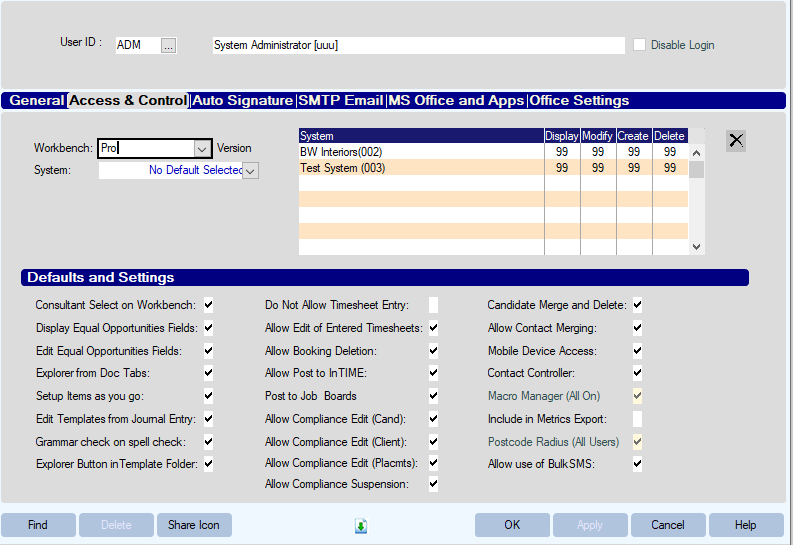
Pic2
| Consultant select on W/B |
This should always be ticked. |
|
| Display equal Op. Fields |
Only tick this for ‘compliance’ managers, or people who should see fields such as “ethnic origin”, etc. do NOT tick for standard users. |
|
| Edit equal op. fields |
As above. |
|
| Explorer from Docs Tab |
Tick this is the user needs the ability to open the ‘documents’ folder for a candidate (or client) using windows explorer. |
|
| Setup Items as you go |
Tick only for users with the ability to add codes to system drop-down menus (e.g. business type, Role Codes, Area codes, etc.) |
|
| Edit Templates from Jnl. Entry |
Tick to allow users to edit/create email templates from the Journal entry screen.
|
|
| Grammar check on spell check |
If the user clicks the spell-check button will the system perform a grammar check as well as spell check? |
|
| Explorer Button in Template folder |
When viewing the DOCS tab of a candidate (or Client or Vacancy) record, is there a button to open the document folder.
|
|
| Do not allow timesheet entry |
Prevents a user from entering timesheets using the ‘TEMPS’ system |
|
| Allow Edit of entered Timesheets |
Allows a user to edit timesheets after they have been entered into the TEMPS system. |
|
| Allow Booking Deletion |
Can the user delete bookings (This applies on the BOOKINGS page of a client record using the X at the right-hand side.) |
|
| Allow post to inTIME |
Only tick this for users allowed to POST Placement details (& documents) to inTIME – only valid if using the integration to the InTIME On-Line timesheets software (In time is a 3rd party company and is not associated with Influence Software in any way,) |
|
| Post to Broadbean |
Tick this for users allowed to Post vacancies using the BroadBean integration link. (if Purchased) |
|
| Allow compliance Edit (Cand) |
Over-rides parameterRECB-Priority(22) which controls the priority level needed to edit compliance items on a candidate and always allows this user to edit irrespective of their priority level. |
|
| Allow compliance Edit (Client) |
Over-rides parameterRECB-Priority(23) and always allows this user to edit irrespective of their priority level. |
|
| Allow compliance edit (Plcmnt) |
Over-rides parameter RECB-Priority(25) and always allows this user to edit irrespective of their priority level. |
|
| Allow Compliance suspension |
Can the user Suspend compliance items. |
|
| Allow Candidate Merge & Delete |
This allows consultants to run a candidate search, then right-click in the results and MERGE two duplicate candidates together to form a single record. |
|
| Allow contact Merging |
Tick if the user is allowed to MERGE two contact records. (recommend this is restricted to a limited number of users) |
|
| Mobile Device Access |
Not in use at present – for future development. |
|
| Contact Controller |
Does this user have the ability to amend/edit the Contact control drop-down on a client record ? |
|
| Macro Manager (all on) |
Allows a user to use the macro manager for mass mailshots (if it says 'All users' then it means the overall system parameter is set to "Allow all users" and it cannot be set individually. - parameter Rec_E, Flag(20) Macro manager Usage: All / Selected / None.) |
|
| Include in Metrics Export |
Does this userID appear in the "Export consultant Metrics" option. If non are ticked they all appear - as soon as one has been ticked then only ticked UserIDs will be shown. |
|
| Postcode Radius |
Tick to allow the user to perform a postcode Radius search (e.g. find candidates within xx miles of a given postcode)
|
|
| Allow use of bulkSMS |
Tick to allow a user to send SMS messages (texts) directly from the system.
|
Auto Signature Tab
This page allows the setup of email signatures that will be used by Influence.
| NOTE: The best/easiest way to set this up is simply to enter the name of the MS Outlook signature that the user has into the Use Outlook Signature field, |
For more information about how to setup your email signature using MS Outlook see our article HERE.
If the user does not have an MS Outlook signature it is possible the create a signature template within the large white box. Right-click in the box to select any 'merge' fields you wish to use.
SMTP Email Tab
This page allows the setup of emailing via SMTP.
If you know the details of your SMTP email server, you can enter these details onto this page and it is possible to send emails directly via this server rather than vi the local MS Outlook email client on the PC.
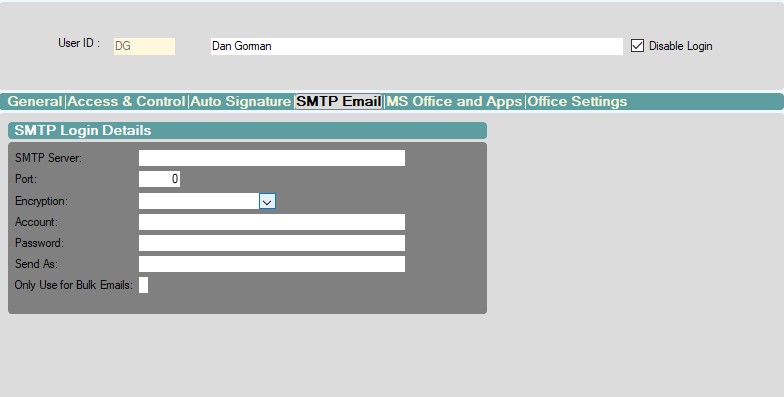
Pic3
Only Use for Bulk emails: This tick box [ ] allows users to choose to only send bulk emails (i.e. email shots via the Macro manager) using this method. Individual emails from the database will still be passed via the MS outlook email client.
MS Office & Apps Tab
This page allows the setup of integration with specific 3rd party products. (Only applicable if you have purchased the relevant features).
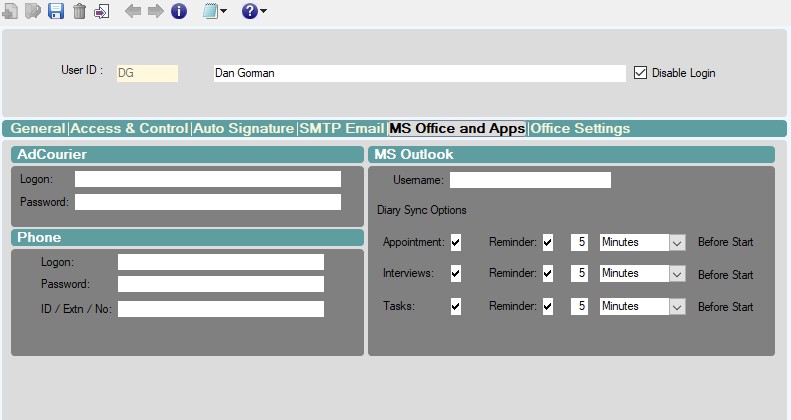
AdCourier:
This section allows integration with BROADBEAN for job posting.Record your Broadbean login credentials here.
Phone:
This section is where you record details of login information for telephone integration. Our preferred telephony partner is Synety - you can find more details HERE.
MS Outlook:
This section is used to control the sync setting for MS Outlook.
Keywords: New, User, Add, Influence, new influence user, new user setup, setup new user, setup new Influence user. Influence user creation, create new user, create new Influence user, add a new Influence User, adding a new Influence user, creating new Influence users, new user ID, create new user ID.
Martin Parkinson
Comments