This article talks about the different uses of the attributes system within Influence. These tips and tricks will only be relevant if you have setup your Attribute system.
If you need some help setting up your Attribute System Click here to view the article for assistance.
Contents (Click an Item to Jump to that section)
Associating Attributes with a Role Code
Attribute 'Quick Select' from Booking Entry
Setup
Associating Attributes with a Role Code
It is possible to associate an attribute with a role, so that the role is 'suggested'
when applicable attributes have been found when parsing a candidate CV.
From version 1.00.16.095 (or later) it has been possible to associate Attributes with Role codes within the system.
If you do this, then when a CV is drag/dropped into the system and parsed for attributes, the “most likely” roles will be indicated at the top of the ROLE drop-down list on the candidate.
Setup
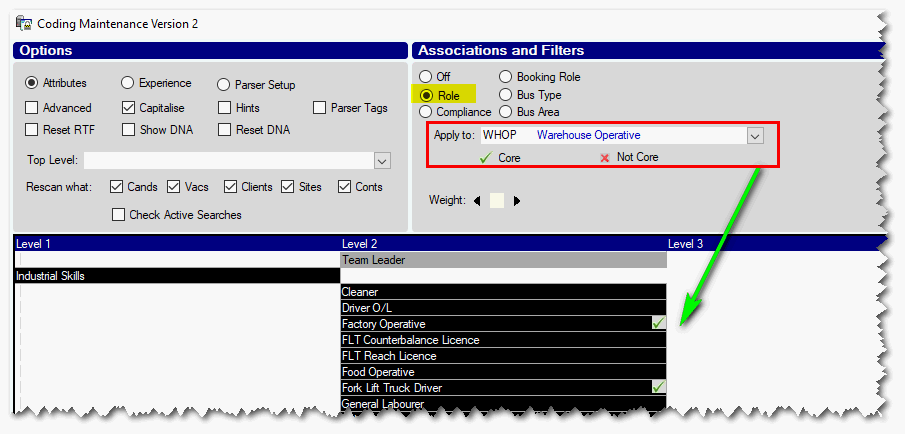
Choose Maintenance > Setup > Attribute maintenance. At the top of the screen select the Role ( ) radio button – the use the Apply to: drop-down to select a role code. Now click on any attributes you wish to associate with that role.
Repeat the process for as many roles as you wish, indicating for each role the attributes that would normally be associated with the selected role.
How it works
When you drag/drop a CV into the database, the system will parse the content of the CV looking for words and will use these to suggest attributes.
Based on the attributes that have been found/selected the system will show suggested roles at the top of the role list, and then all other roles below this.
The system shows a weighting bar with the most likely roles listed at the top, and also indicates how many of the suggested attributes for the candidate are relevant to that role.
Examples
Example 1:
The role WHOP (Warehouse Operative) has several attributes associated to it. (Factory Operative, Forklift Truck Driver, Order Picker, Packer, Picker, Warehouse - Pick by Line, Warehouse - Despatch, Warehouse - Pick by Location and Warehouse Operative)
The attributes which have been associated with a role are indicated by a TICK
(See Below)

This means that if these words/items are spotted on a CV, the system will suggest the role of WHOP (Warehouse Operative) based on the items indicated.
Example 2:
A CV contains words which have resulted in the attributes [Scrum], [Waterfall], [Oracle 8] and [Agile] being suggested.
Based upon these attributes suggestions, the ‘most likely’ role is Developer (11-hits).
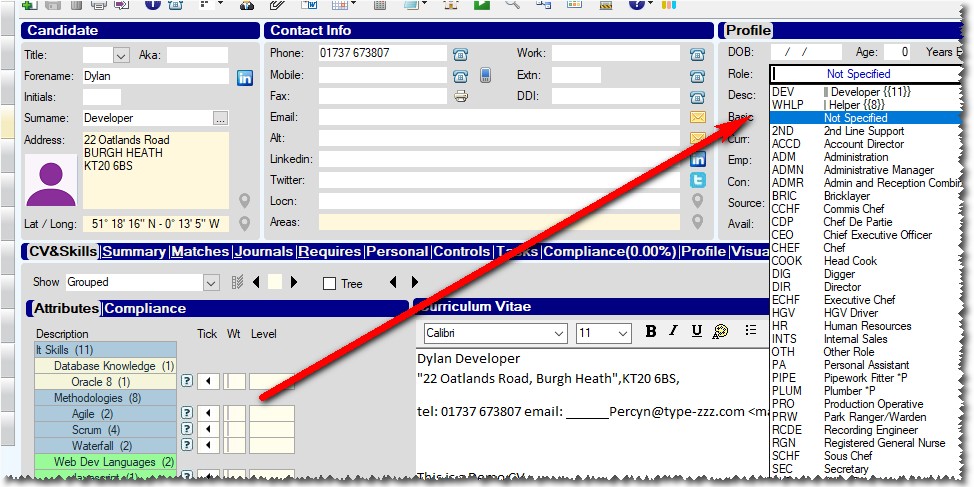
When selecting a role for this candidate, the user may well want to choose from one of these suggested roles, but is free to choose any role that they wish and
does not have to stick to the suggestions.
Compliance/Attribute Link
Influence professional has a compliance system which allows users to define various items such as Proof of ID, Professional certification and licences, and have these checked when making bookings or placements.
Influence also has an Attributes system which allows users to create skills and tags and assign them to candidate or clients, and then run searches based upon these attributes.
It is now possible to Link these two parts of the system together so that every time a compliance item is completed, there is a matching attribute which becomes ticked and searchable for the candidate.
This feature is introduced after version 1.00.17.213 of the software.
How it Works
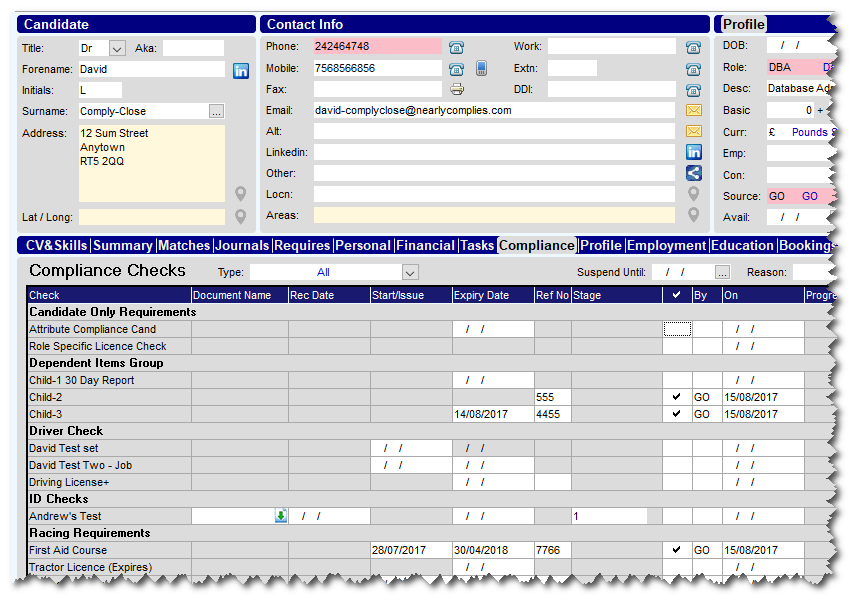
If you go to a candidate, and select the [Compliance] tab of their record, you will see details of all the compliance items which have been created in the system. Completing the details on this page will make the candidate compliant for any of these items, some of which may have an expiry date.
Once items have been completed on the [Compliance] tab , they will be reflected in the matching attributes setup on the [CV&Skills] tab of a candidate.
There will be a new 'Tab' of attributes, usually labelled Compliance (although the name can be changed)
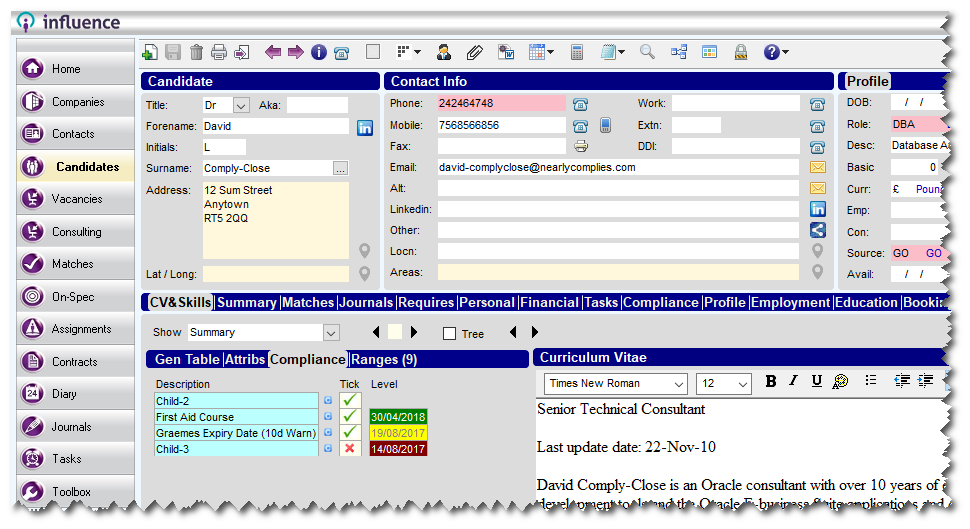
Any compliant items with be marked with a TICK. Those which have expired will be marked with an X.
For compliance items which have an expiry date, the expiry date will be shown, and colour coded accordingly:
| GREEN |
All OK, not expired. |
| YELLOW |
Still OK, not reached expiry but within 'Reporting' range * |
| RED |
Item expired. |
| * When creating compliance items, it is possible to define a 'reporting' range, where the system will start warning you an item is 'about to expire'. E.g. Passport Checks may have a reporting range of 60-Days to allow time to advise the candidate and allow them to obtain an updated Passport. |
Setup & Configuration
Before the feature will start working you will need to be on a suitable version of Influence professional (ver 1.00.17.213 or later) and it will need to be setup and configured.
Simple Setup (Automatic)
Login as a suitable 'high priority' user (e.g. ADM)
Go to Attribute Maintenance and select the Compliance ( ) radio button.
Click the [Resync] button.
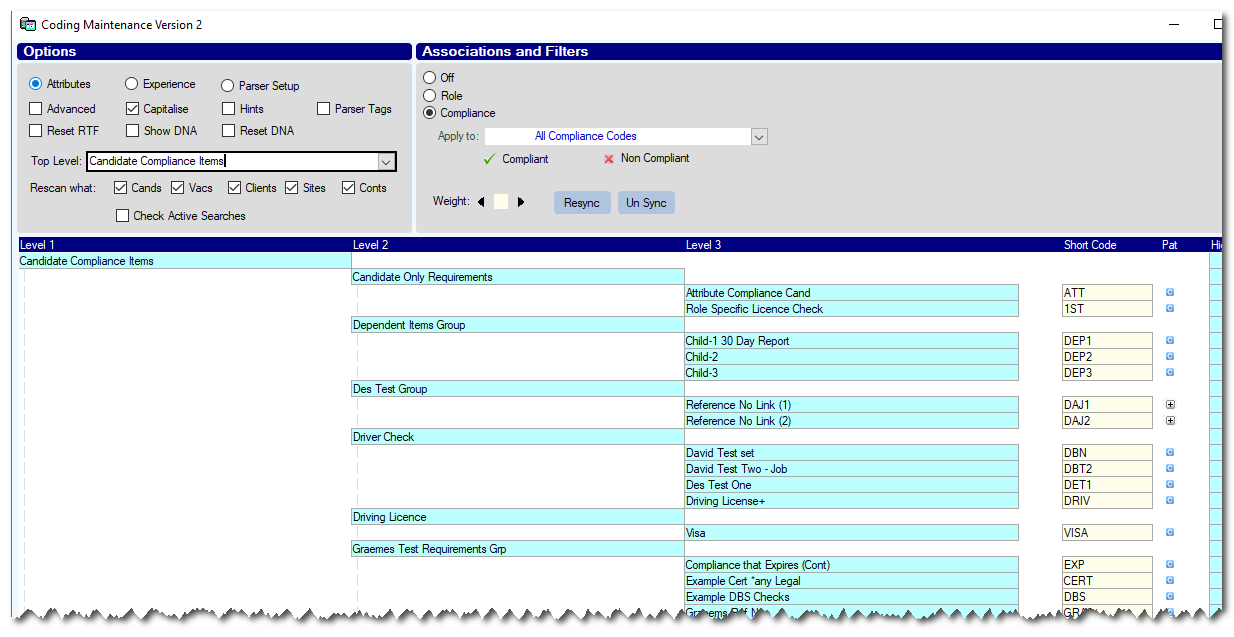
The system will create a two sections within your Attribute structure for Candidate Compliance Items and Company Compliance Items (if applicable)
For each compliance item you have defined the system will create a matching attribute in the relevant section, and will set the relevant items for each candidate.
From then on any amendments made to the [Compliance] tab of a candidate will be instantly reflected in their Attributes.
| NOTE: The system will create attributes for compliance items at the time that the Sync is performed; if additional compliance items are defined at a later date you will need to re-sync in order to get the new items added to the attribute structure. |
Using the [UnSync] button will remove all the attributes which have been created, and return the system to the state it was before Compliance/Attributes were linked.
Manual Setup
Using the automatic setup as described above is the easiest way to get the system to create attributes for every compliance item you have defined, and to link them together so that changes on the [Compliance] tab are reflected in the attributes.
However, if you do not want every compliance item to be an attribute or if you have already created some attributes which you are using to track compliance, you can manually link compliance items to existing attributes in the following way.
- Login as a suitable 'high priority' user (e.g. ADM)
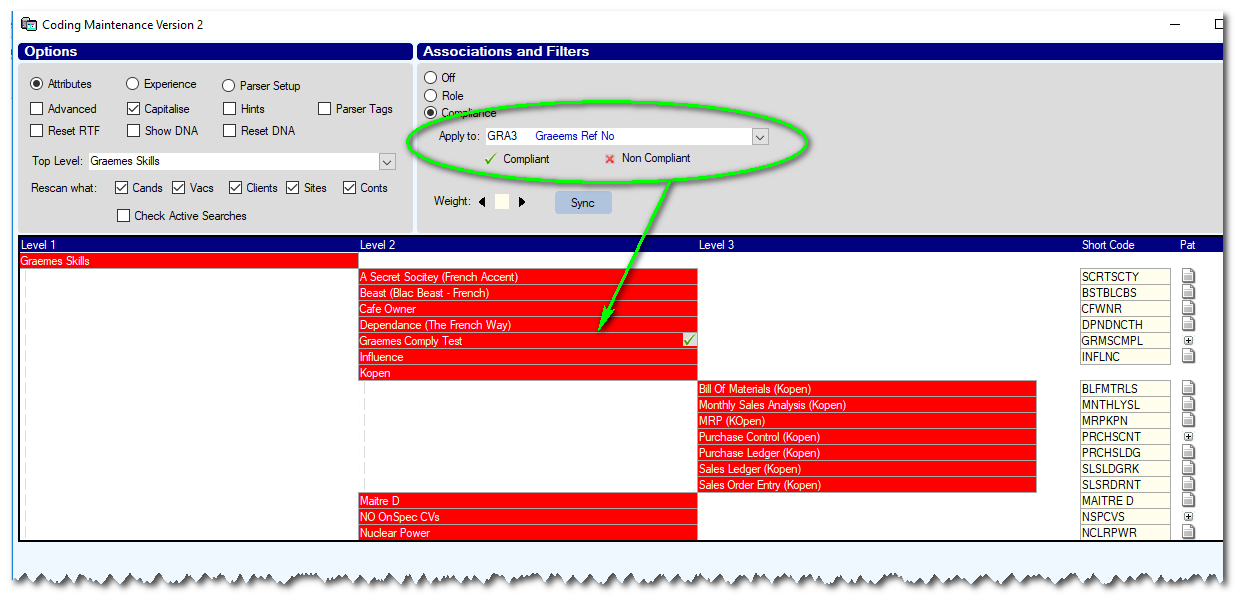
- Go to Attribute Maintenance and select the Compliance ( ) radio button.
- Use the drop-down labelled "Apply To" and select a compliance item
- Select one of the existing compliance items and click on the description to 'link' it to the chosen Attribute.
(The system will display a small TICK to indicate that it is linked)
Repeat the above process for as many Attributes/compliance items as you wish to link together.
Having linked attributes/Compliance items manually they will behave in a similar way to those created using the automatic Sync. i.e. When the linked compliance item is valid, the Attribute will be ticked - as soon as the linked compliance item is no longer valid (e.g. it has expired or is not complete) then the attribute will not display.
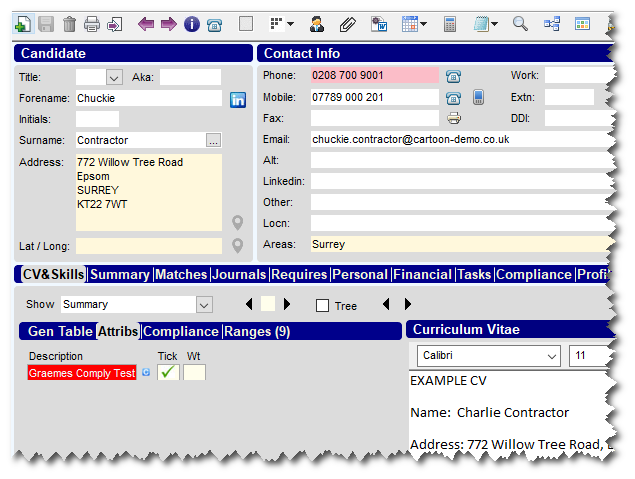
e.g. In the example below the Attribute is linked to a compliance item and shows a
TICK to indicate that the candidate is compliant.
Attribute Selection from Booking Entry Form
After release 1.00.19.298 a new feature has been introduced to allow users to filter suggested TEMP workers from within the Booking Entry Form.
The system has always suggested temps suitable for a particular ROLE, but it is now possible to filter the list of suggestions to find people with specific attributes (Skills) as well as the correct ROLE and Availability.
In order to use the feature there are several steps:
(Click an Item below to jump to the topic)
1) SETUP: Associate some attributes to the Role.
2) USAGE: Make an unfilled booking and the use filters in conjunction with the [Suggest] button.
1) Booking Role (Quick Select) - Setup
Choose Maintenance > Setup > Attribute maintenance. At the top of the screen select the Booking Role ( ) radio button – the use the Apply to: drop-down to select a role code. Now click on any attributes you wish to associate with that role.
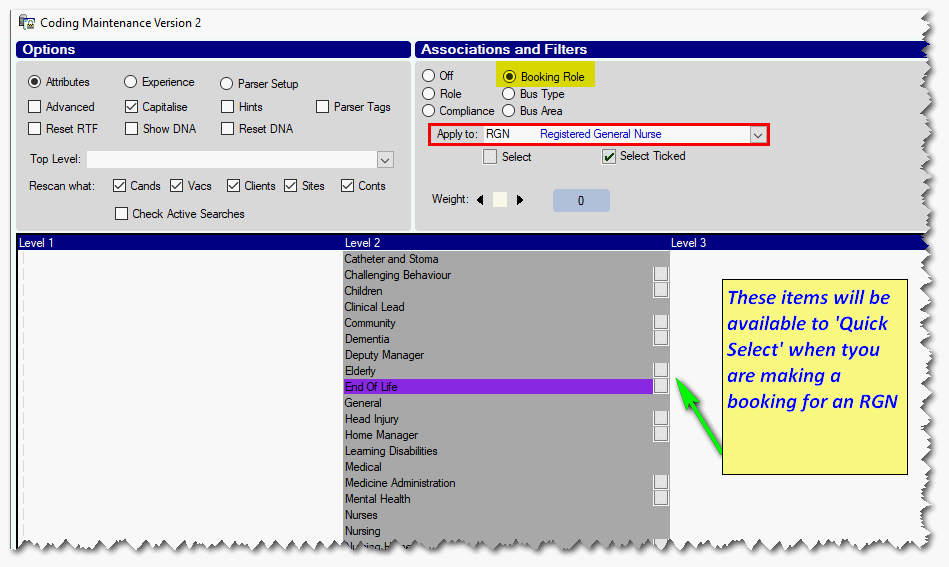
If they are marked with a box [ ] then they will be available for you to 'Quick Select' when making an booking. (Any marked with a TICK will be 'pre-selected' when making a booking - which is not usually preferable)
Repeat the process for as many roles as you wish, indicating for each role the attributes that you would normally want to 'Quick select' when making a booking.
2) Usage : Searching for Temps using the 'Quick-Select' Attributes.
Create an unfilled booking in the normal way (i.e. from the PLANNER or using the [Book] button on the [Bookings] tab of a client or candidate record.)
Fill in the Booking Entry form in the normal way (Client, Contact, ROLE, dates, Start time, etc.) and click the [Suggest] button at the bottom left.
The system will then suggest a list of TEMP workers for the selected ROLE who are available on the chosen dates/times.
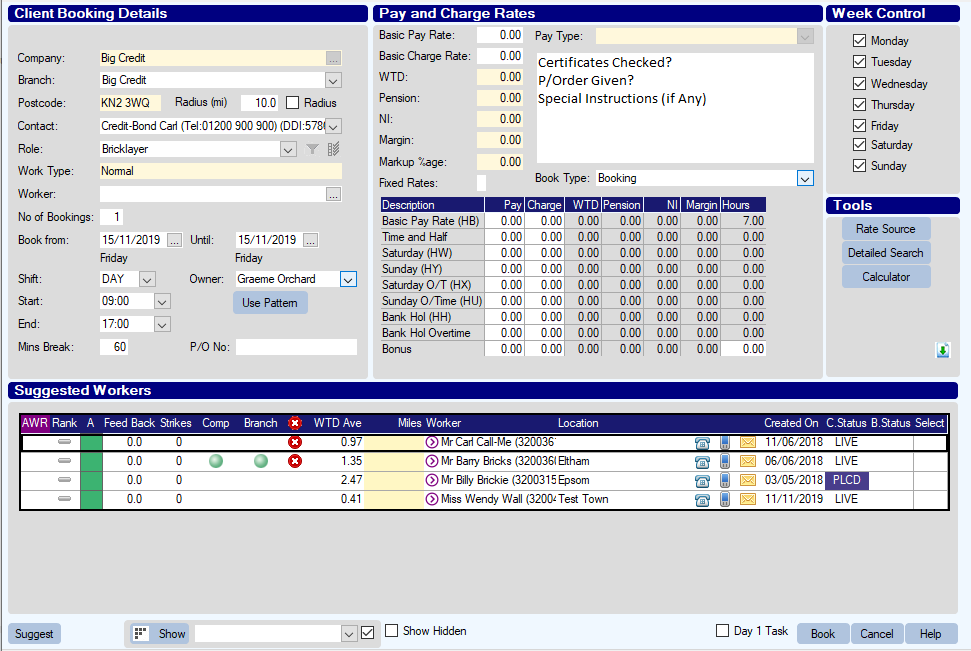
If you want to filter the list to find workers with a particular Attribute/Skill
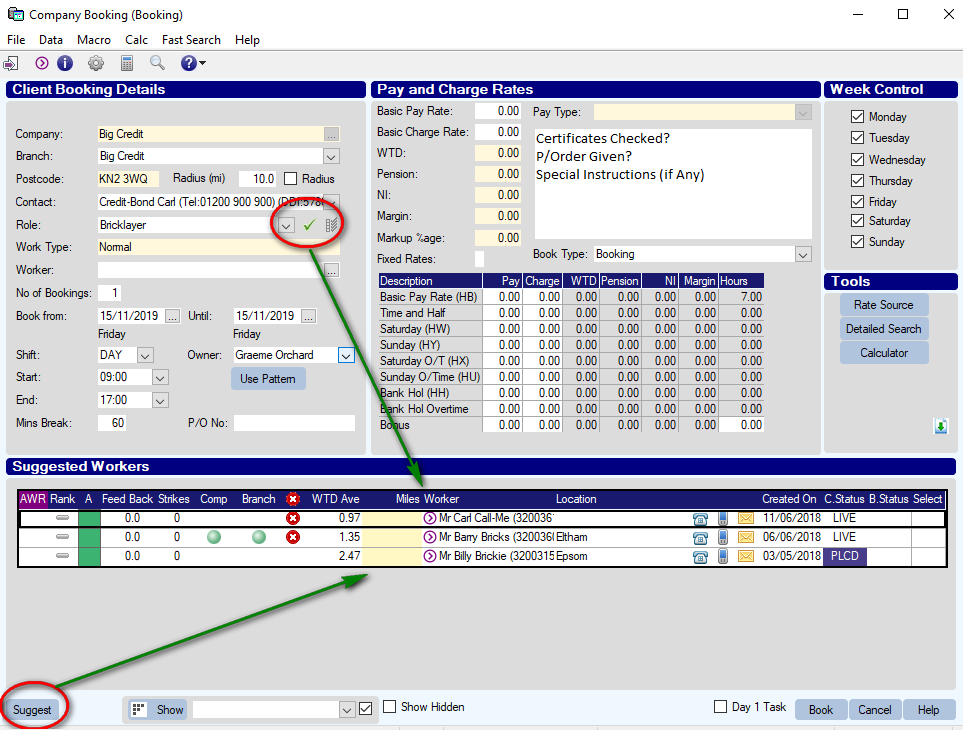
You will see that next to the ROLE, there are some icons ('Filter' and an 'Attributes' icon)

If you click the Filter icon (Funnel) the system will pop-up a screen showing attributes that have been associated with the ROLE. You can then tick those attributes (skills) that you need, choose AND or OR to combine them, then press [OK]
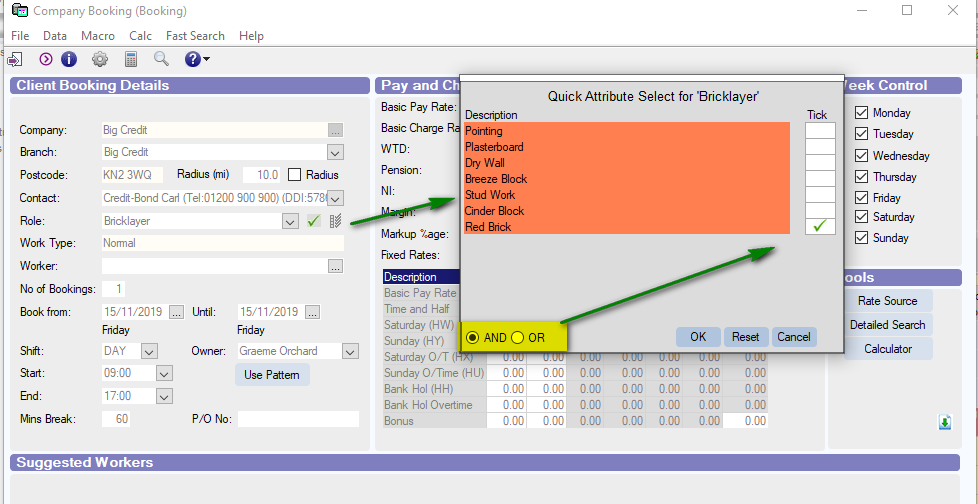
The system will then filter the suggestion list to return only those candidates with the required skills. (The fact that a filter is being applied is indicated by a TICK next to the ROLE - see below)
In the example above the list of Bricklayers available on Fri 15th Nov has been filtered to only those who have the "Pointing" skill.
Lottie Coley
Comments