The MS Outlook Sync agent is a system feature that can automatically scan a mailbox and sync the emails from the chosen mailbox(es) into Influence as Journals.
In many cases it is not necessary, and it is better to manually sync any required emails in batches, by dragging/dropping selected batches of emails into the system as this gives far greater control over which emails are chosen to be stored.
| NOTE: This tool will only work on systems using Journalling v2 - If your system uses Journaling v1 then you will need an update/file conversion before this can be used |
| Warning : Use of this tool can greatly increase the amount of disc space used by the system due to the storage of these emails. If you are on a hosted system this may occur additional charges if your storage needs exceed your allowed quota. |
| !!IMPORTANT!! - Please do NOT activate or turn-on this feature without reference to the Influence support team. You will need a license to use the feature, and also there are some technical details of your mail provider that should be checked before starting this process. |
If you decide you do want to use the Sync Agent rather than benefit from manual control over what gets synchronised, then the article below explains the setup process.
| Note: Turning on the Sync Agent will turn off the Alert Manager which usually runs to alert users of tasks, since this is now handled as part of the Sync Agent. |
Contents (Click an item to jump to that section)
- Select the MS outlook Folders
- How to Manually Sync Folders (prior to Auto-Sync)
System Setup
Before you start to use the sync agent, you will need to contact Influence in order to obtain an updated licence which allows use of the Sync Agent Tool. The new PCG_Lic.txt file containing the licence will need to be loaded into the system to allow use of the feature.
Parameters
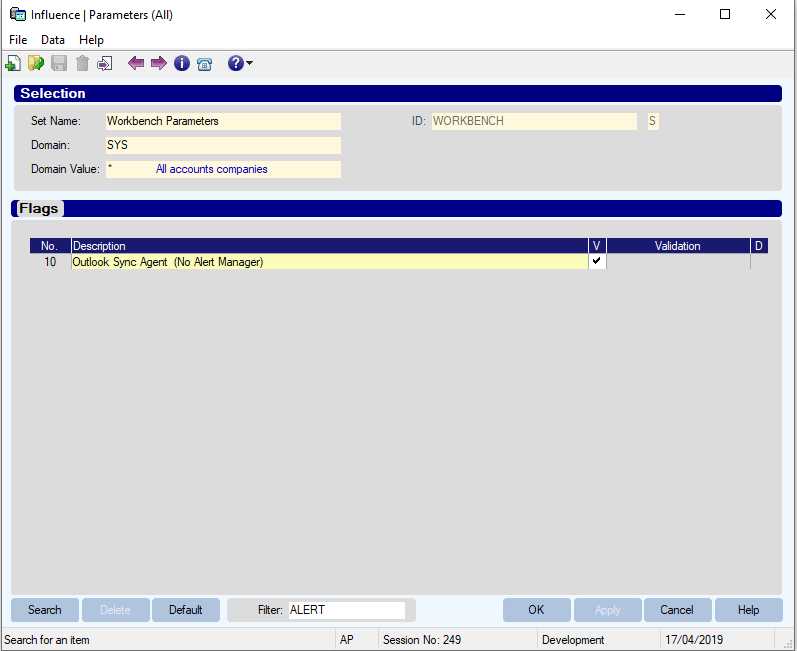
| WORKBENCH, Flag(10) |
Tick this to turn on the feature (It only works if you also have the license) |
| JOURNALS, Integer(17) Outlook Auto Sync Days to scan back |
14 We recommend setting this to 14 Do not use excessively high numbers such as 50 or 100 ! |
1) Parameter to turn on Outlook sync agent: Workbench, Flag(10)
| Note: Turning on the Sync Agent will turn off the Alert Manager which usually runs to alert users of tasks, since this is now handled as part of the Sync Agent. |
2) Once the Sync Agent has been turned on, each user must login to Influence and setup the agent for their own Profile. Go to the [HOME] Page and click the 'House' icon in the toolbar to open the My Profile page
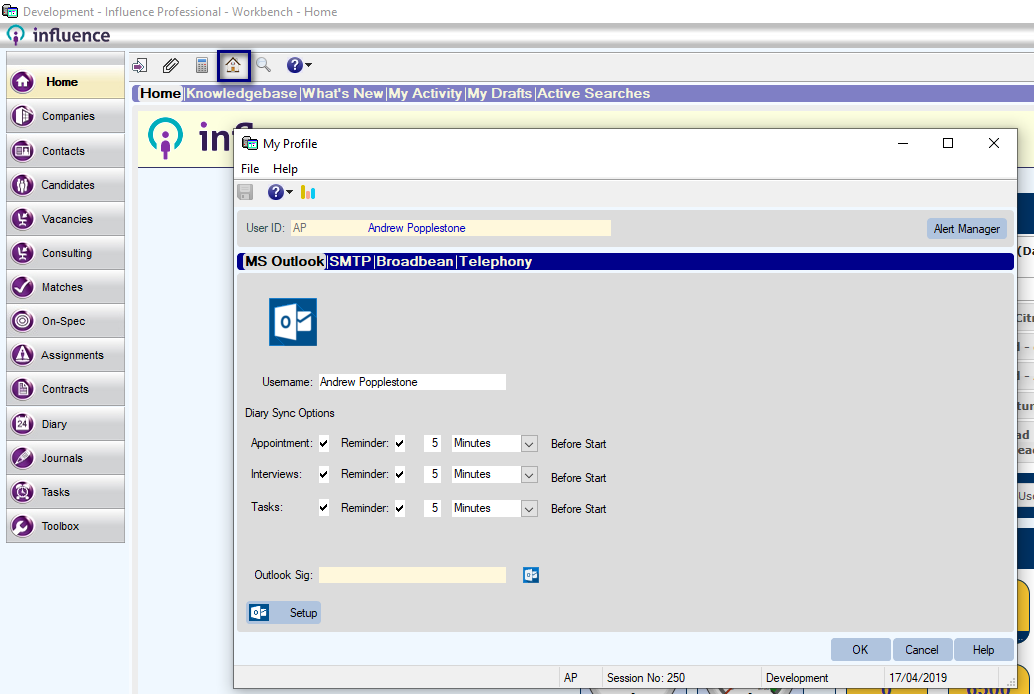
Set the [Username] - this needs to be set to be the same as your Username in Outlook.
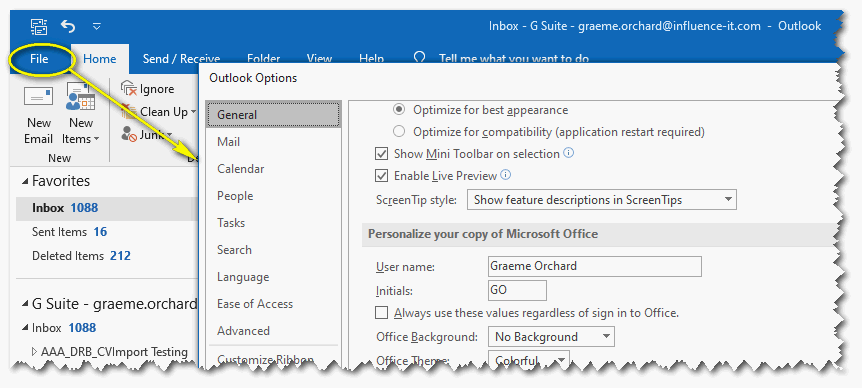
| Tip: Your MS Outlook username can be found in the Outlook options. (For example in MS Office 2019, choose File > Options, and then use [General] to see the User Name.) See below |
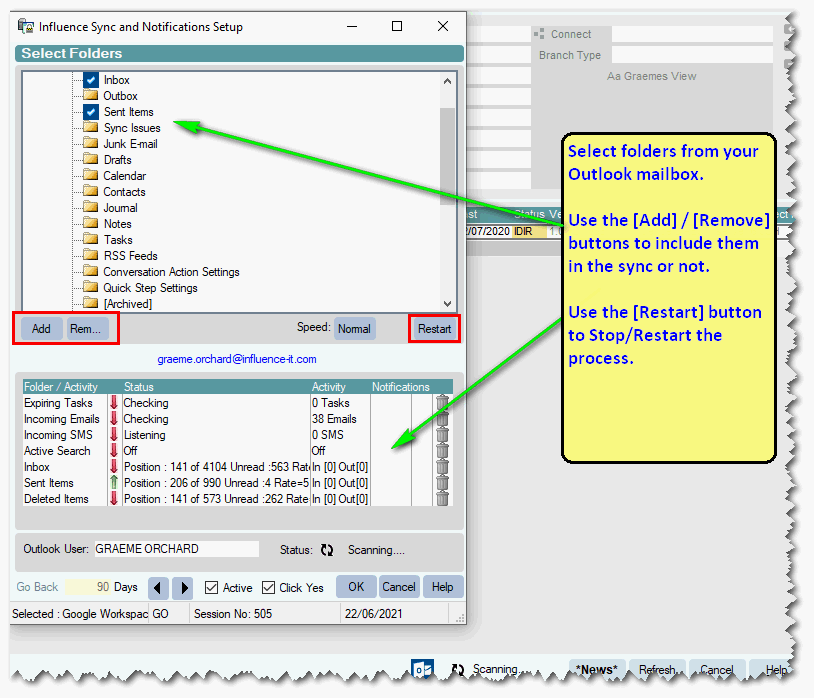
Step 1: Select the Folders to Sync
Click the 'House' icon in the toolbar at the top of the screen to open your Profile page.
At the bottom left of the My Profile page is a button labelled Setup
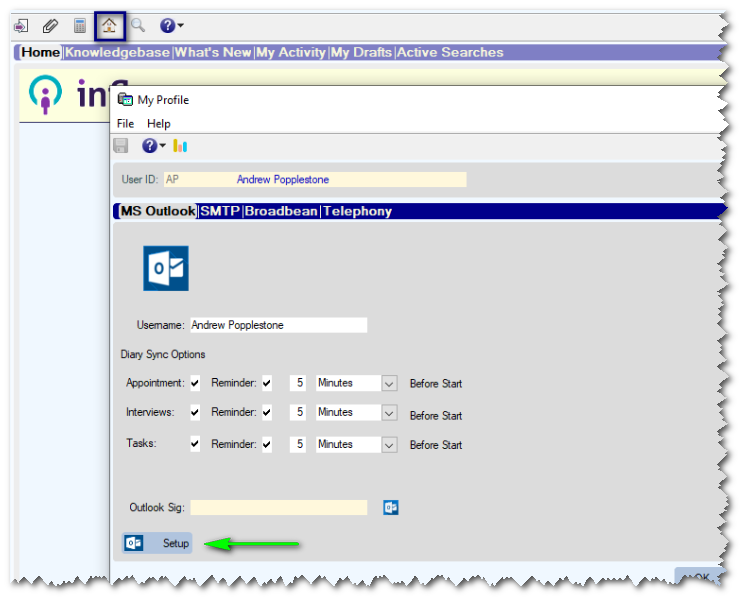
Click Setup to select MS Outlook folders to be monitored/scanned by the Sync Agent. Select the required folders and then use [Add] to add them.
(See below)
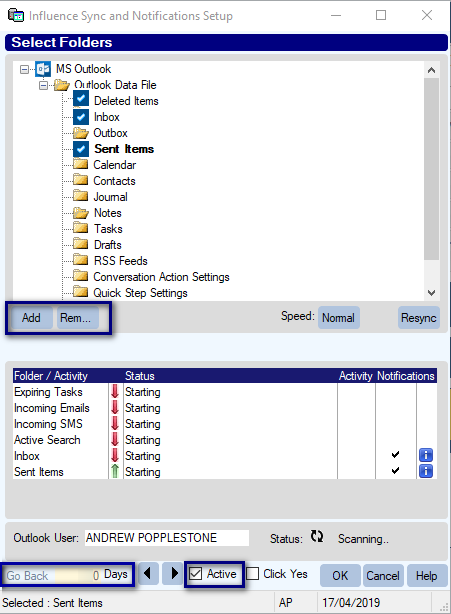
| IMPORTANT: You must set the Go Back to more than 7 days, e.g. 14 (and not Zero [0] days.) |
| NOTE : Before starting the scan for the first time, please manually sync any of the specified folders by using the Toolbox option in Influence. If you start the agent without having performed this initial manual sync, then you will cause yourself severe delays and server performance will be drastically reduced |
Step 2: Turn off [Active Search]
Make sure that the Active Search option is set to Off
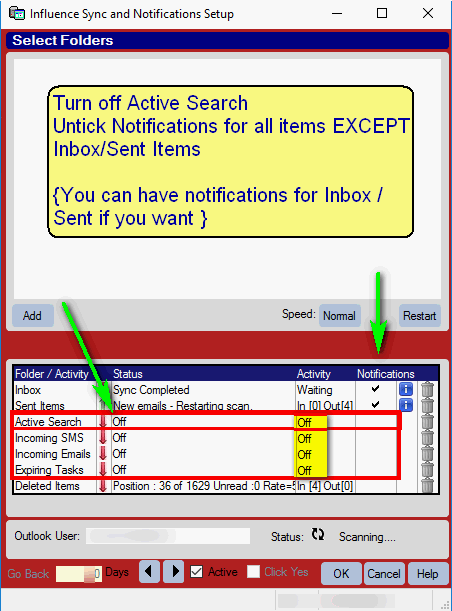
You can also untick Notifications.
You must not have this ticked for Active Search.
We recommend it is not ticked for Incoming emails, Expiring Tasks or Incoming SMS.
It is optional if you want this ticked for Inbox/Sent items or Not.
Step 3: Start the agent running
To start the agent running, Tick the Active [ ] tick box at the bottom of the screen, next to the ◀️▶️ arrows.
After the agent has started, it will take a few seconds to begin processing. We recommend that you turn OFF the 'Active Search' option, as this is known to cause issues. See below
| Remember: It is strongly recommended to untick the Active search and make sure it is turned off, does not have notifications and doesn't scan, as this can cause severe performance degradation. |
NOTES/Clarifications
- When the sync agent is running it is normal for received emails to take a while to appear in the database and will not be 'instant'. This can range from 30sec up to 4-5Mins, and is designed to minimise the load on the server.
- If an email contains an attachment, the attachment will end up stored on their the Candidate [Docs Tab] or the Client [Docs Tab], dependant upon whether the email address matched a candidate or a contact.
- If a contact at a client is also a candidate and both records share the same email address, then any synced emails will be visible on the Candidate record and the contact Record via the [Journals] tab, but not on the Client Record [Journals Tab]
This is because essentially the email is treated as being relevant to the candidate, and this is shown on the person (candidate/contact) but not at their employer (Client)
How to Manually Sync Mailbox Folders
As mentioned above prior to starting the Auto Sync it is strongly recommended to manually sync any folders that you will be auto-syncing. Failure to do this before starting the auto-sync can cause severe degradation in server performance and make your system massively slower.
Step 1: Select and scan the Folder you wish to Sync
Choose the [Toolbox] option at the left hand side, and expand the Outlook Mailbox to choose the folder you wish to scan.
Having chosen the folder, click the [Refresh] button at the bottom right, and then click [OK] on the scan option.
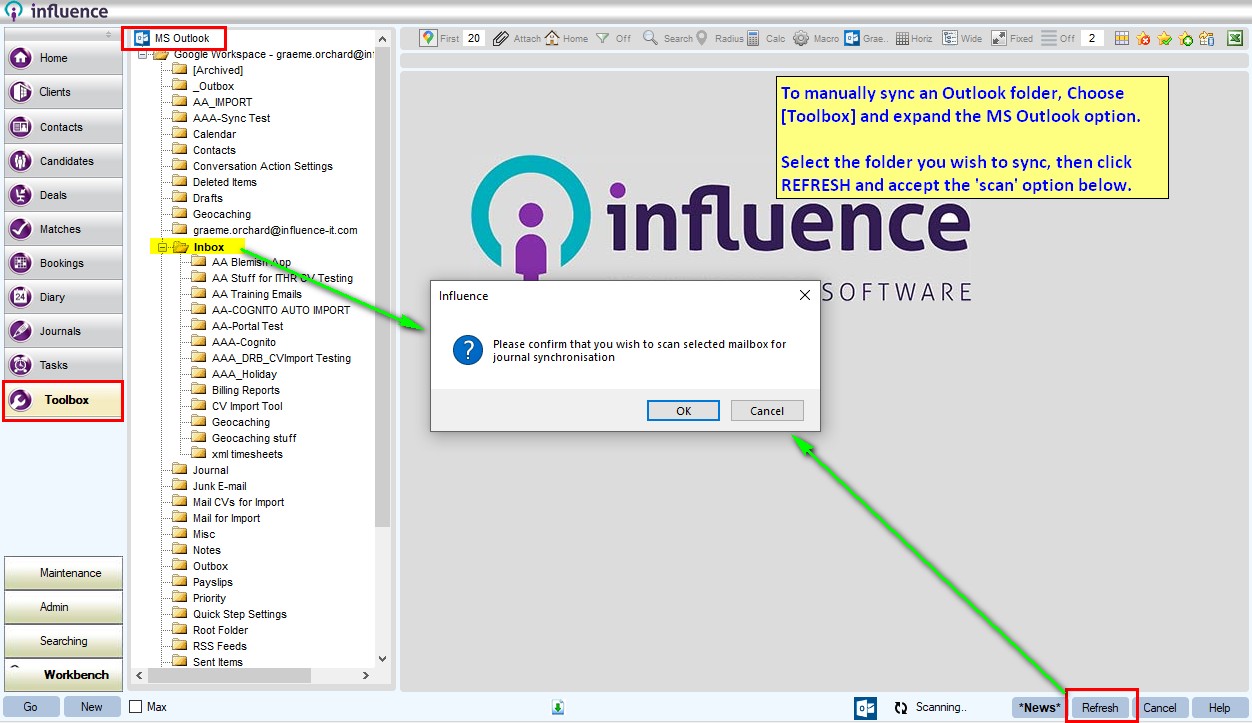
Step 2: Sync the scanned folder
After the scan has completed choose the [Click to Sync] option to actually sync/import mails from the chosen folder.
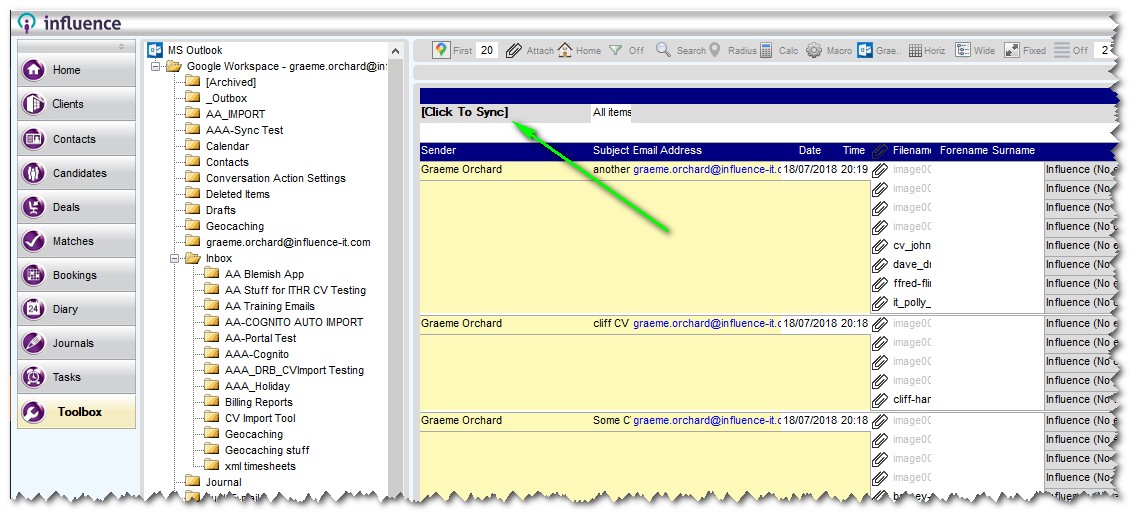
WAIT.
Depending on the size of the folder this option can take some time. Please be patient.
TROUBLESHOOTING
If things don't work as expected, or you are experiencing problems, here are a few things to try.
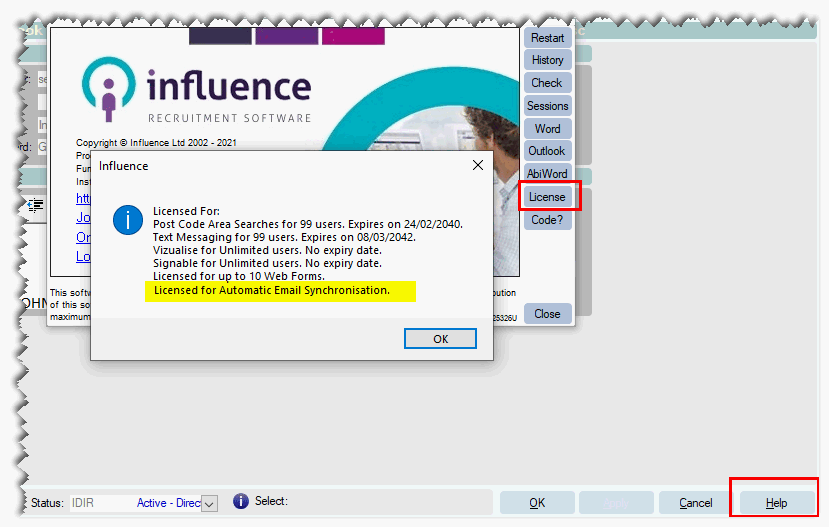
Check for a License.
Before checking anything else, make sure the License is installed. Go to [HELP] and then chose [License]
Stop/Start the Sync Agent.
Try stopping and re-starting the Sync agent and see if that helps.
Try the same thing with MS Outlook (Log Out, then back in again) - sometimes that can be enough to sort things out.
Reselect the folders.
If a simple stop/start didn't work you might want to try stopping the agent, then removing the folders and re-adding them, one at a time. This is especially true if you have just recently moved PC, or if you have had to re-install MS Outlook.
This is because the folders have a unique identifier in the background, and if this has got changed, it might look as if you have selected the correct folders, but the system may not actually be able to find them.
Restart your PC/Remote Desktop.
After trying the above solutions the classic "Turn it all off / Turn it all on again" is a good ploy. If it is a desktop/laptop, then simply shut everything down and turn it off.
IF you are using a 'Remote Desktop' then make sure that you properly "Log Off" from the desktop rather than simply 'disconnect' which will leave all the old processes (and problems) running in the background.
Check the Install of KClient/K7Connector (Admin rights).
If the K7Connector software used to link to the Influence database was not installed by a user with Administrator privileges and setup for "All Users" then the software is unable to open multiple windows. This causes problems with the Outlook Sync tool.
You will need to re-install the K7Connector software and ensure to tick the 'All Users' option when prompted.

The latest version of the K7Connector should be downloaded and installed from
www.influence-it.co.uk/downloads
Multiple KCLIENT Sessions Popping Up.
If you are getting lots of KCLIENT login screens popping up after you have logged into influence, this could be because you have not cached your password. (saved password to computer memory.)
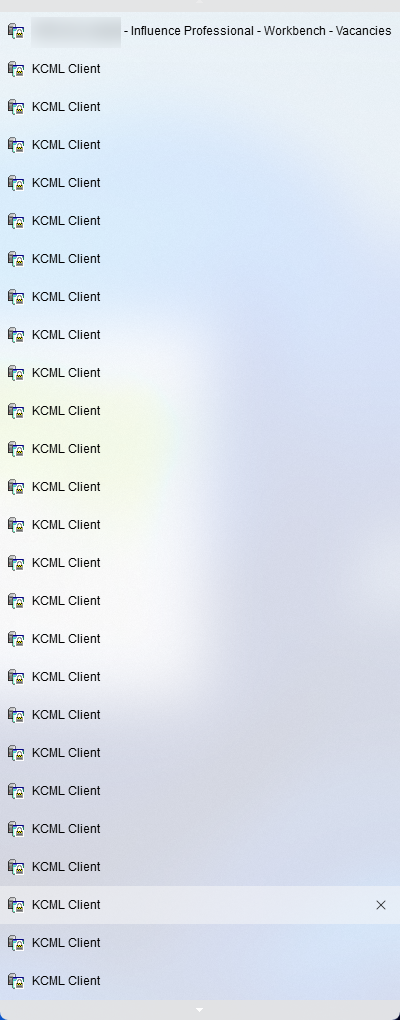
These will Pop-up if you have your outlook mail sync turned on and you haven't cached your server password.
What happens is it will try to sync your outlook emails to influence and it will try to open the syncing session needed in influence, but will fail to do so and pop-up the login screen. It will then keep trying to sync your emails and open the syncing session, but can't login to the session.
To resolve the issue you will need to close influence, right click on your icon and select properties.

This will open a pop-up window where you can need to change your 'Login type' to 'Cache Passwords'
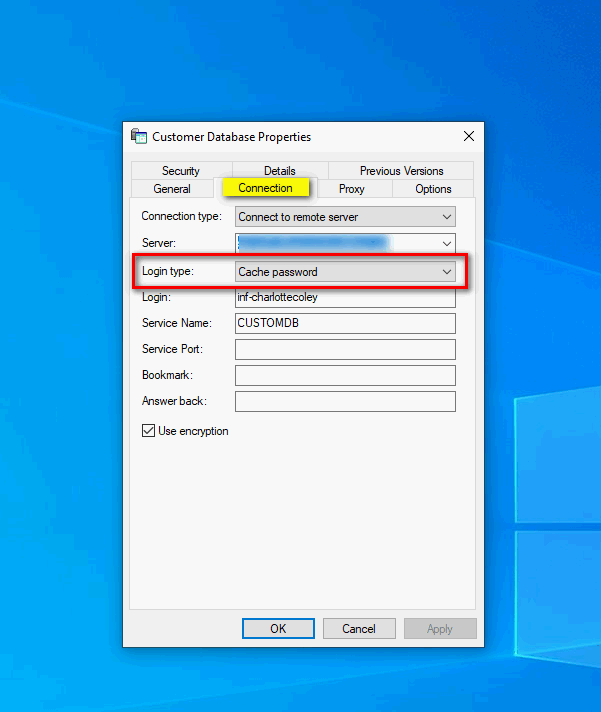
Changing this to be 'Cache Password' will mean that when you double click on the icon it will automatically log you into the KCML (Server) login page.
Andrew Popplestone
Comments