Adding a new influence icon to your desktop is something that you may need to do if you are installing a new PC or if you are using a PC/Laptop that has previously been used by another user. The steps to install a new KClient and create an icon are explained below. The icon is what you click in order to open the database.
IMPORTANT:
YOU MUST USE A WINDOWS BASED MACHINE. THIS SOFTWARE IS NOT AVAILABLE FOR APPLE MAC. IF YOU WISH TO USE A MAC YOU WILL NEED TO INSTALL WINDOWS ONTO THE MAC FIRST
Before you start.
Before you begin to install a new icon onto your desktop you will need to gather some information from another user who has a working Influence icon on their desktop.
Go to their PC and right-click on the Influence icon and choose Properties > Connection then make a note of the settings for;
Server: ?????? (Often something like: server1.in.......xxxx...)
Service Name: ??????? (Sometimes shows as "Connect to Service")
(TIP: if you are connected to a network, you can copy the icon to a central folder so that you can then find it and copy it onto the new laptop instead of noting all the settings.)
The basic steps are: (Click an item to jump to that section)
1) Install the K7 Connector software to allow you to connect you your database.
2) Setup an Icon to connect to the server/database.
Optional
- There are some settings you can 'tweak' - (Not needed but can help)
- Troubleshooting - If things don't work, these are actions to try.
(1) Install the Connection Software
1) Open the internet on your PC and go to the Influence download site
http://www.influence-it.co.uk/downloads/
Download the following files:-
K7Connector.exe
NOTE: The K7 Connector software will only run on a Windows operating system. If you are using an apple Mac, you will need to setup windows on the machine before you can run this software. (Search Google for "Install windows 10 on your Mac" for help with this.)
2) Run the file K7connector.exe and follow the on-screen instructions.
Important: When installing the KClient software you must be logged onto your computer as a user with Administrator privileges.
Make sure that the radio button for Everyone who uses this Computer is selected.
3) If you cannot select 'Everyone' do not install the software - you will need to logon to your computer as an administrator before installing the software.

(2) Setup Your Connection Icon
Having installed the KClient software you can now create an icon on your desktop.
Tip: If you have your icon on another PC/Laptop or if you saved it to a central shared folder on your network you can simply Copy/Paste it from the other laptop or shared folder onto the Desktop of your new one.
If you don't have access to the other icon, or need to start from scratch, then:-
Right click anywhere on the desktop and choose New -> KCML Client.
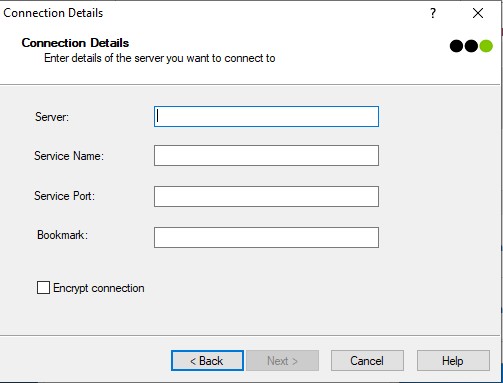
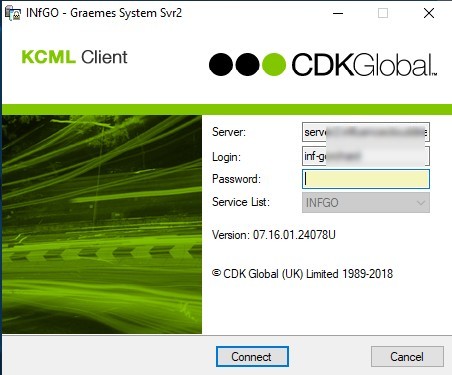
Complete the connection details using the information you noted earlier, i.e.
Connection Type: Connect to Server
Server: xxxxxxxxxxx (i.e. Whatever you noted earlier in 'Before you Start'.)
Service Name: XXXXXXXXX <(Whatever you noted earlier in 'Before you Start')
Login Type: Cache Password
Login: xxxxxxxxx (Whatever you noted earlier in 'Before you Start'.)
Password: ??????????? - you will need to know this. Speak to your IT provider or system admin if you do not.
NOTE: The Service Name is case sensitive, so if the service was called MERRYWEATHER you must enter this in UPPER CASE as shown.
a) Enter the server details, and SERVICE NAME (which is CASE sensitive)
TIPS
Common servers:
If your database is on our Direct Server 1 use: server1.influenceclouddirect.uk
If your database is on our Direct Server 2 use: server2.influenceclouddirect.uk
If your database is on our Direct Server 3 use: server3.influenceclouddirect.uk
If your database is on our Direct Server 4 use: server4.influenceclouddirect.uk
If your database is on our Direct Server 5 use: server5.influenceclouddirect.uk
Service Name:
Usually the Service Name is related to your own company name, e.g. Merryweather Recruitment would probably have a service name called MERRYWEATHER
(Service names are typically all UPPER CASE)
If you do not know the service name, please contact us and we can tell you what your service name is.
b) Complete the login details to connect to the server.
If using our Influence Direct (hosted) service these details will have been provided to you
If influence is installed on your own server/hardware then you will need to credentials to connect to that database server. (Often the Login is "Influence" but may vary depending what was created by your IT support provider when setting up the server.)
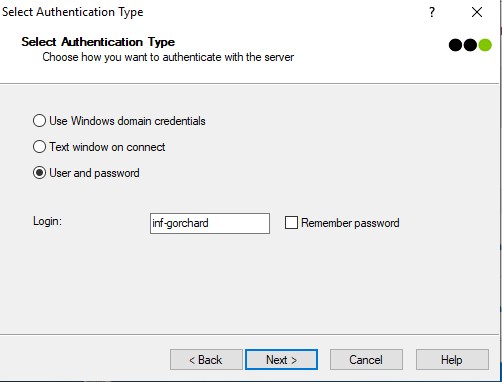
Example: If your company is called Merryweather Recruitment and your database is hosted on our direct server your login will likely be a 4-character code followed by some form of your name: e.g. merr-joesmith
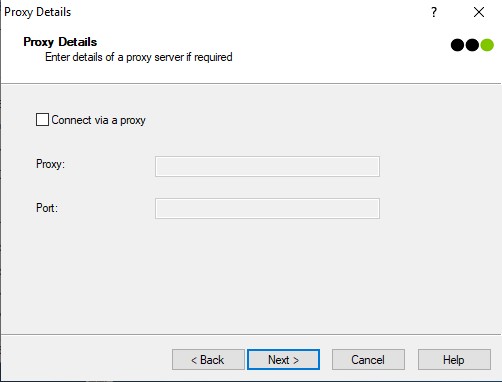
c) Just press [Next] to skip past the Proxy Details screen.
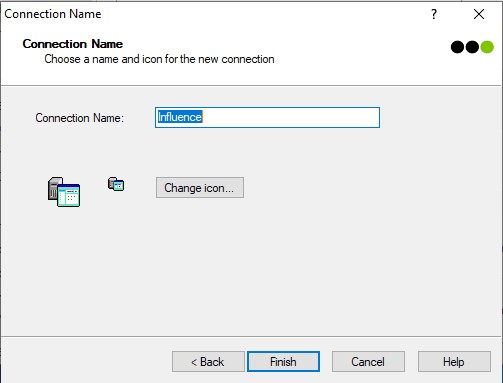
d) Give the icon a name you will recognise (e.g. Influence-Joe).
Advanced Setup (Optional)
Having setup the KClient and installed an Influence icon on your desktop you should now make sure that the Cache Size and Location are set correctly.
Double-click the Influence icon to begin the login process. Once the Influence login screen appears displaying the purple Influence logo, click in the very top left corner of the window and choose 'Preferences' then select the CACHE tab.
On the CACHE tab make sure that size for the cache is 20mb (not 50mb) - If it is set to 50mb then reduce this to 20mb.
Troubleshooting
Once you have installed the KClient software and setup an icon, you should be able to double-click the icon on your desktop, and connect to the Influence database.
i) The first time you login, you may see a login screen with server and login information, which is requesting a Password.
In this case you will need to enter the password for the server.
Subsequent logins should go past the server screen and take you to an Influence login window requesting a User ID and Password.
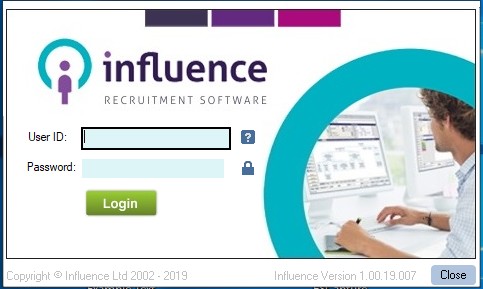
The details for this second screen will be different than those for the server and will usually be a 4-character User ID, and a personal password to get into the database itself.
ii) If you are unable to connect then you may need to add an exception to your firewall.
Please open your firewall software and add an exception for Port 790 of the Influence database server.
e.g. If your influence server is IP address 192.168.10.20, then you would need to add exception for 192.168.10.20, Port 790
NB: Some firewalls do not allow an exception for a specific port, in which case you should simply add an exception for the whole IP address.
iii) If you still cannot connect to the database, you may need to add some Programs as exceptions in your firewall/Anti-virus software.
Please add the following programs as exceptions.
KClient.exe, KService and KWebAdmin
iv) If you see the message Host Refused Connection it is likely that you have clicked the icon in the Task Bar at the bottom of your Win7 screen. This icon in the task bar will not work - please click the Influence icon on the desktop which will contain all of your credentials and will work correctly.
Optional
If you are using an older version ofMS Outlook (prior to 2007) you may need to install ClickYes. This is a small program that allows Influence to communicate with MS Outlook. Versions after Outlook 2007 will communicate directly provided that your Anti-virus software is up-to-date.
To install the ClickYes software do the following:
1) Go to www.influence-it.co.uk/downloads, find and download the Software.Zip file.
Open this file and find Software\Clients\ExpressClickYes\ClickYesSetup.exe
2) Run the file ClickYesSetup.exe and follow the onscreen instructions.
Once the file has been installed you will see a small ClickYes icon in the taskbar. Right click the icon and make sure that you have ticked the options for Start on Logon and Start Suspended
Graeme Orchard
Comments