This guide explains the methods for getting candidate CVs into the Influence database. there are several methods for doing this, and each method is explained below:
Contents (Click an Item to Jump to that section)
- Import Candidate names/addresses from an Excel Sheet
- Import Multiple CVs from a Folder
- Import multiple CVs from a mailbox (email folder)
You can also import CV's automatically into Influence, click here to go to the relevant article.
Importing a Single CV/Candidate
The 'normal' method for importing a candidate is to Drag/Drop a CV onto the [Candidates] workbench of your Influence Professional Database. As soon as you drag a *.doc, *.pdf, *.txt or *.rtf file onto the system, Influence will open a new candidate record, parse the CV for skills, and attempt to extract the name, address and email from the document.
Once the CV has finished processing users can manually edit or amend any of the details of the newly created candidate record, then press [OK] to store these.
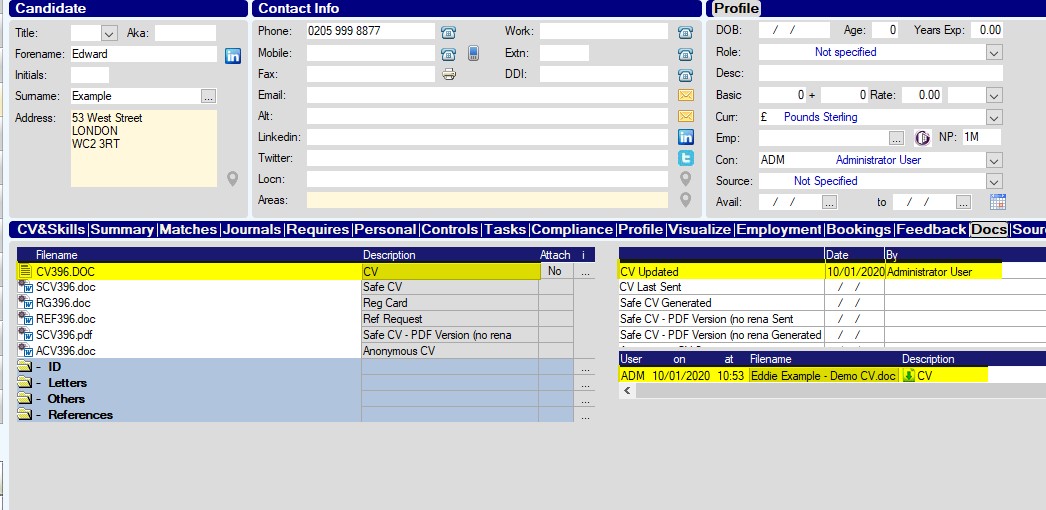
| Note: The CV document which was dragged/dropped into the system will be stored on the [Docs] tab of the candidate record which will show the Date/time that the CV was updated (i.e. dragged into the system) |
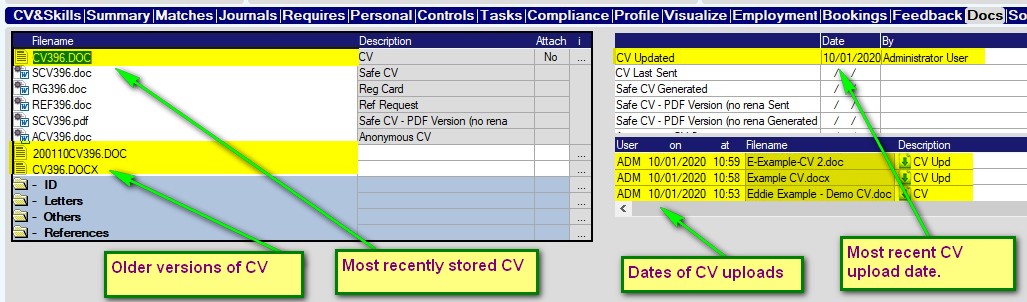
If the CV is subsequently updated by dragging/dropping a new document onto the [CV&Skills] tab of the candidate record, then the system will:
- Update the text seen on the [CV&Skills] tab.
- Replace the 'CV' on the [DOCS] tab and move old copies out of the way.
- Record the date of the update on the transaction log. (See below)
Importing a Batch of Candidate Names & Addresses from Excel
It is possible to create candidates from an excel spreadsheet containing names, addresses and telephone numbers.
Whilst the candidates will not have any CV documents stored it is often useful for importing lists of people who you may then contact to obtain CVs and update accordingly.
To import candidates from Excel follow the process below:
- Login as the ADM (admin) user, or a user with suitable access
- Go to Maintenance > Tools > Candidate import from MS Excel.
The screen shows some instructions and a list of the columns of information you can import.
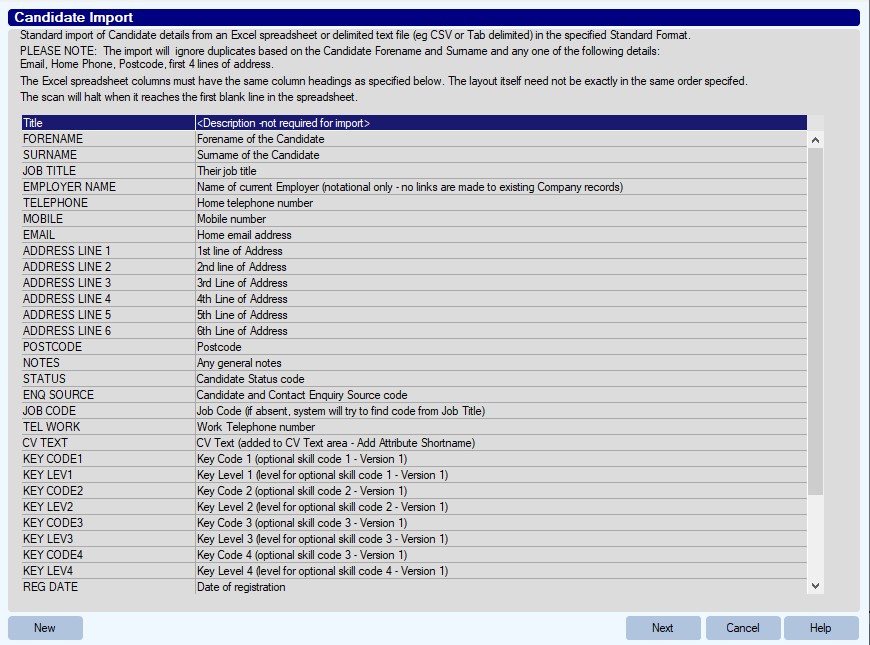
| Tip: If you click the [New] button the system will open an excel sheet with the correct column headings which you can populate with your data. You can delete any heading you do not wish to use, but do not change them. |
Once you have completed the spreadsheet make sure it is saved as Excel 97-2003 Workbook (*.xls)
- Click [Next]
- Drag/Drop the excel sheet containing your data onto the screen.
The system will check the sheet to make sure it is the correct format.
- If all is well then press [OK] to import the candidate records into the database, then [Cancel] when completed.
Importing a Batch of Candidate CVs from a Folder
It is common for users to have a folder full of CVs stored as *.doc or *.pdf files. It is possible to get the Influence Professional database to import these into the system, save the CVs and create candidate records.
Before you start
Ensure that the CVs have been saved into a directory that is visible on the network, and can be seen by both your PC and by the Influence server.
Step 1
Login as the ADM user, and choose [Maintenance] > [Tools] > Candidate Import from Folder.
Pic1
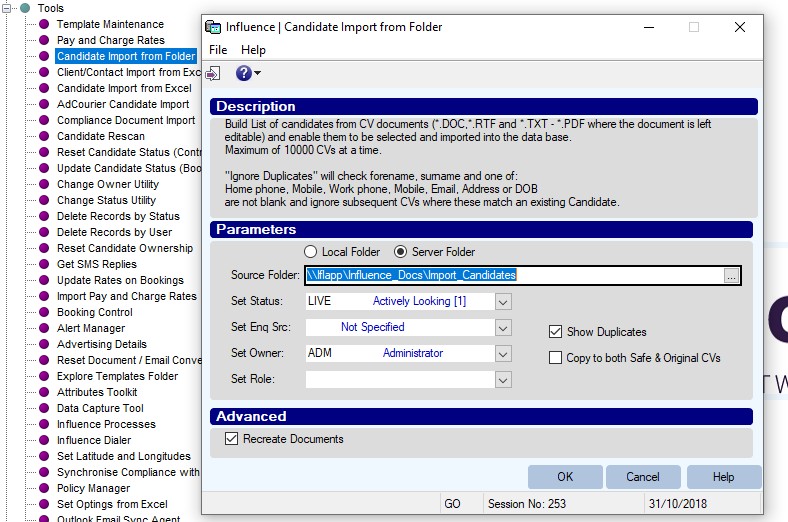
Click the [...] button to open the candidate import folder. If you wish you can create sub-folders in here to hold batches of CVs.
| Note: if you are using Influence Direct you will not be able to click [...] and must type or copy/paste the name of the local folder containing your CVS e.g. C:\TEMP\Import_CVs |
Specify the path to the folder containing the CVs, and drag/drop the CVs you want to import into a folder here.
Ensure that Recreate Documents [ ] is ticked
(This is for internal Influence use only, and must always be left ticked.)
Choose from any of the other options such as Set Status, Set Role, etc. These will allow you to set these fields for the entire batch.
If you wish to see any potential duplicate candidates then tick the Show Duplicates option.
Click [OK] to run the option.
Step 2
Wait! Depending upon how many CVs, the system may take a while to pre-process these documents. If you import LARGE batches of CVs, this can be a slow process.
| Tip: We recommend importing in batches of no more than 200-300 CVs at a time. |
Pic2
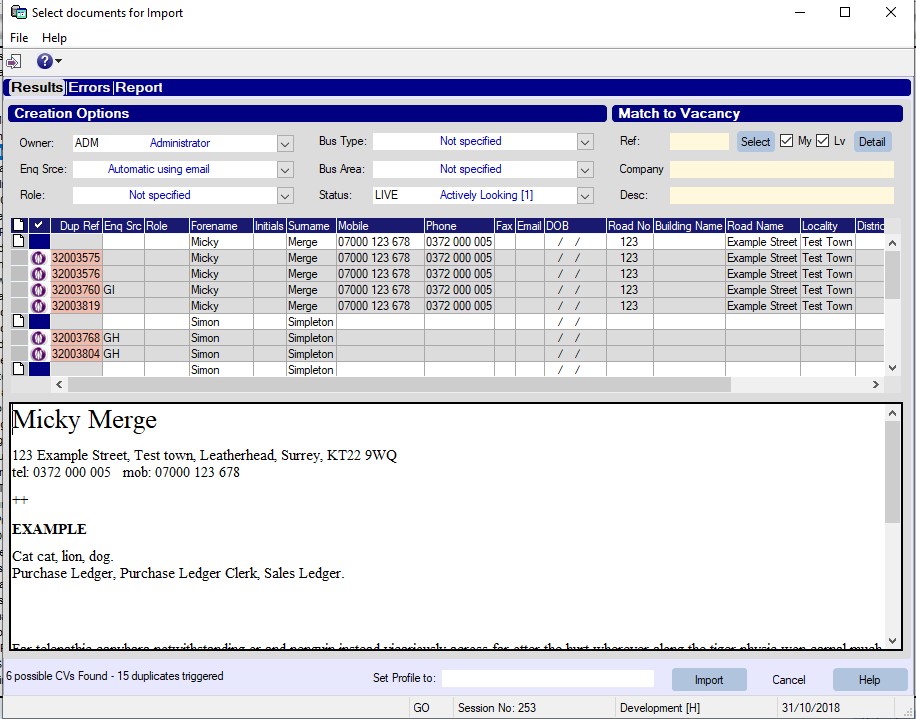
Make sure that there is a tick next to all the CVs which you wish to import.
Any potential duplicate candidates already on the database will show with a purple icon, and pink Ref. number.
You can open duplicate candidates by clicking the purple icon.
You can open any of the import CVs by clicking the document icon on the left. Import the new CVs by clicking [Import]
Step 3
In the case of any errors (usually duplicates) these can be seen by viewing the [Errors] tab.
pic3
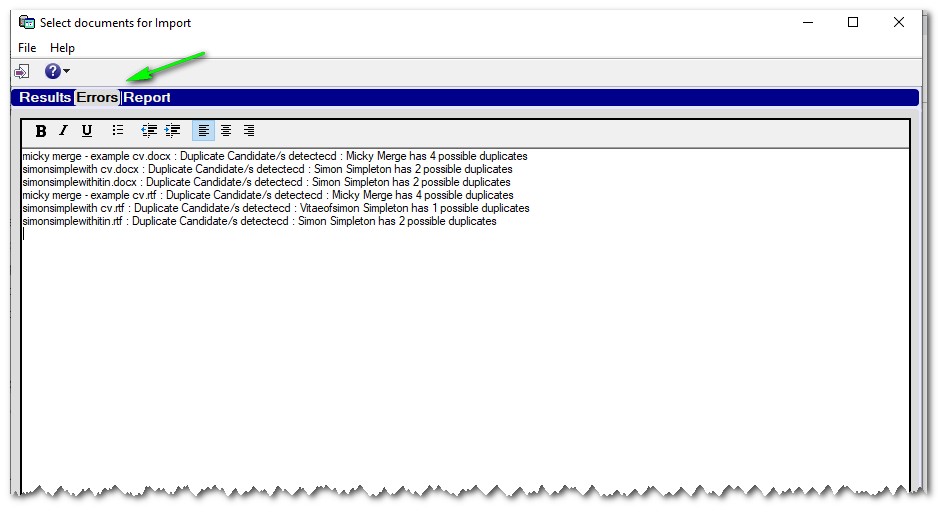
If you wish, you could make a note of the CVs which are duplicates, and then manually Drag/Drop these documents onto the existing candidate records in order to update those candidates with the latest CV.
| Note: Originally the bulk upload tool did not have the ability to update the CV for existing candidates if a duplicate is found. After version 1.00.18.299 the system will now handle duplicates. When the system finds one or more duplicates, the first duplicate will be updated with the new CV, new skills, etc. All other duplicates will have this new documents stored on their [DOCS] tab in a folder called Duplicates to indicate that a (potentially) newer version of the CV exists. |
There is normally a directory specially setup for importing CVs from on your Influence server, called Import_Candidates which can usually be found in the following way.
Start > Computer > My Network Places, then find the folder called Influence_Docs. Inside this folder should be a directory called Import_Candidates. Create yourself a new directory in this folder, e.g. MyCVs, and then drag all the CVs you want to import into this folder.
e.g. \\server\Influence\Influence_Docs\Import_Candidates\MyCVs
If you do not have access to this folder/directory, because of the setup or permissions of your infrastructure, then either speak to your IT support provider OR create an alternative folder on the server/network and point the import tool at that instead.
Importing a Batch of Candidate CVs from a Mailbox (email Folder)
You can import multiple CVs from an email folder in order to create candidate records.
Step 1
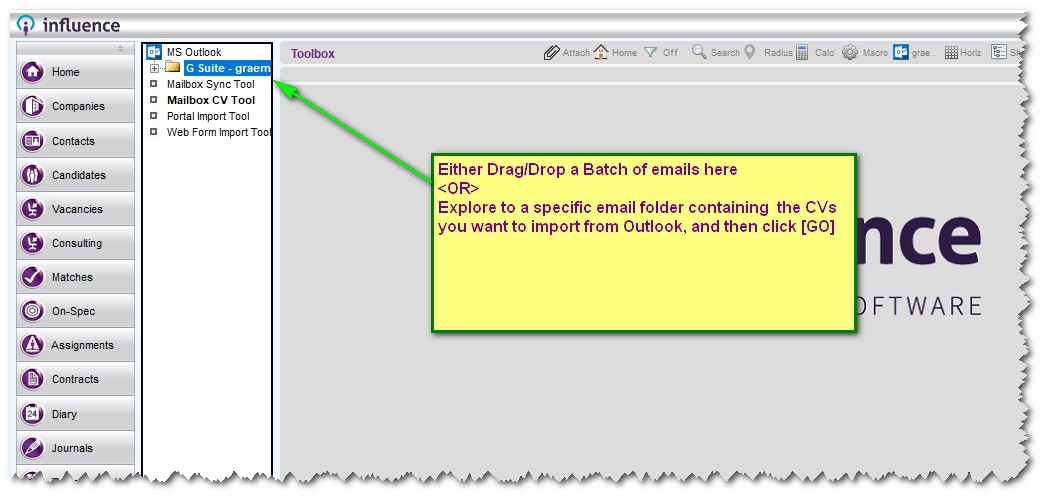
Go to [Toolbox] and choose Mailbox CV Tool
If you have a few emails with CVs (e.g. 10-20ish) then you can simply drag/drop the emails onto this screen. If there are a large number (e.g several hundred) then it is probablt easier to Expand the MS Outlook at the left, and explore to select the folder containing all the CVs.
Having chosen the folder contianing emails with all the CVs, click [GO]
Step 2
The system will pre-process the emails to work out which ones have an attachment that might be a CV. The system will place a TICK next to the items it will try to process as CVs - if there are any other items you want to treat as a CV then you should tick it manually.
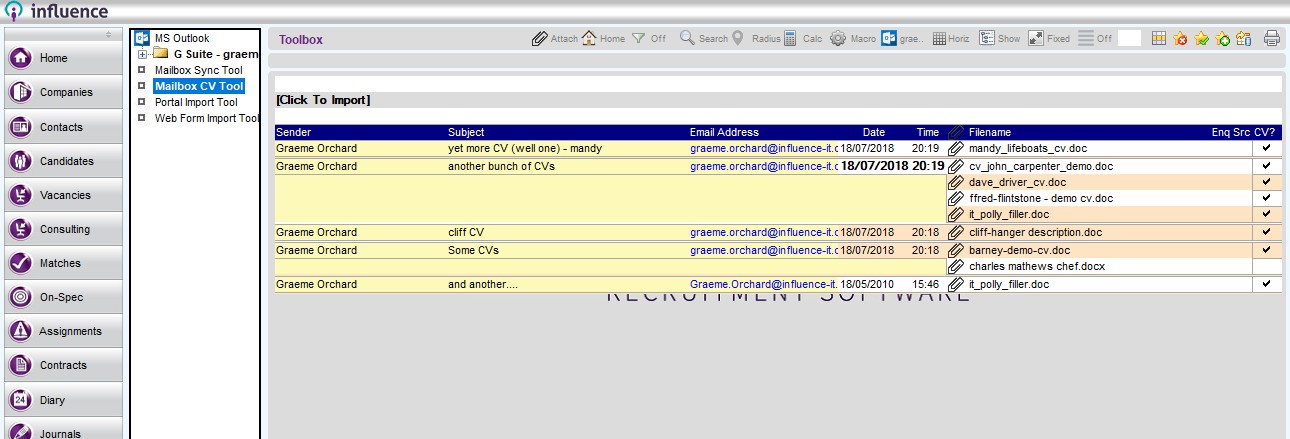
| Tip: You can tick ALL items by clicking on the Column heading labelled CV? |
Step3
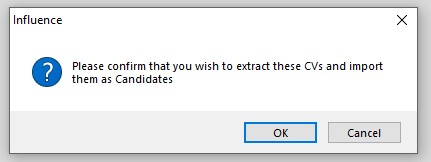
Click [Refresh] at the bottom right to begin the import process. The system will ask if you wish to proceed and will then process each of the attachments and attempt to read information to create a candidate.
This step may take some time. Please be patient.
Step 4
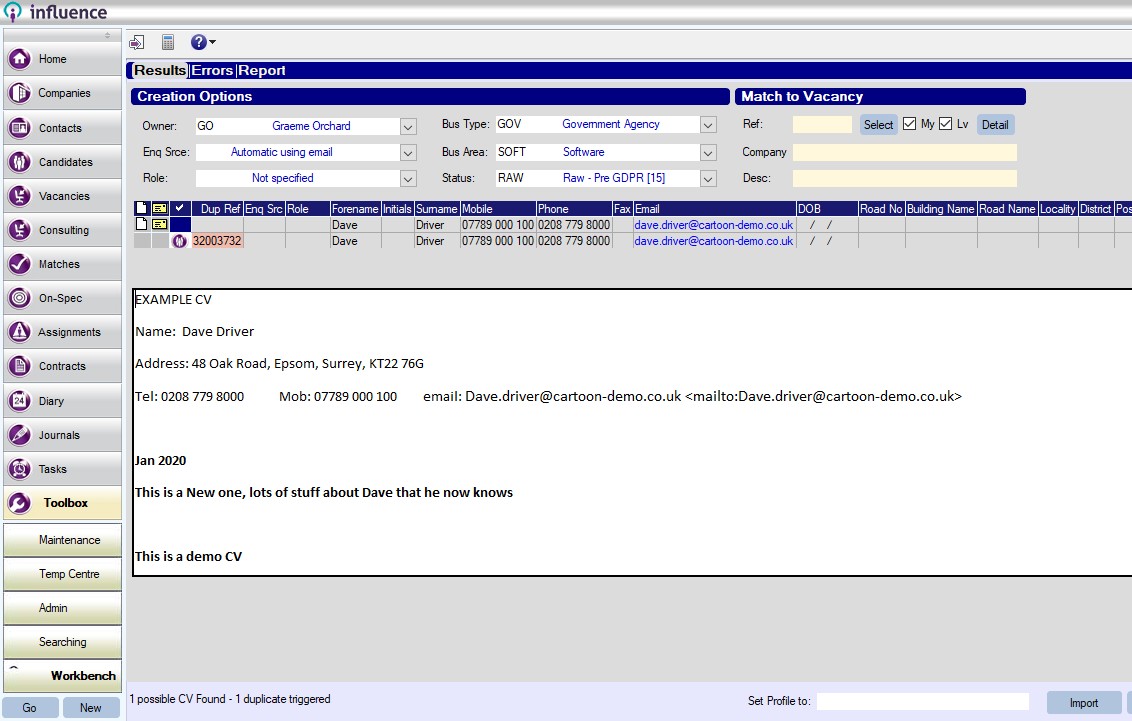
Once all the attachments have been processed, the system will display a grid showing what it has been able to parse out of each CV.
- Any records which will be imported will show a Tick in the column at the left.
- Any records where the system believes that the candidate already exists will be Un-Ticked. There will be one (or more) small purple icons below showing the reference number of the Existing Candidate. You can open the existing candidate record by clicking on the icon.
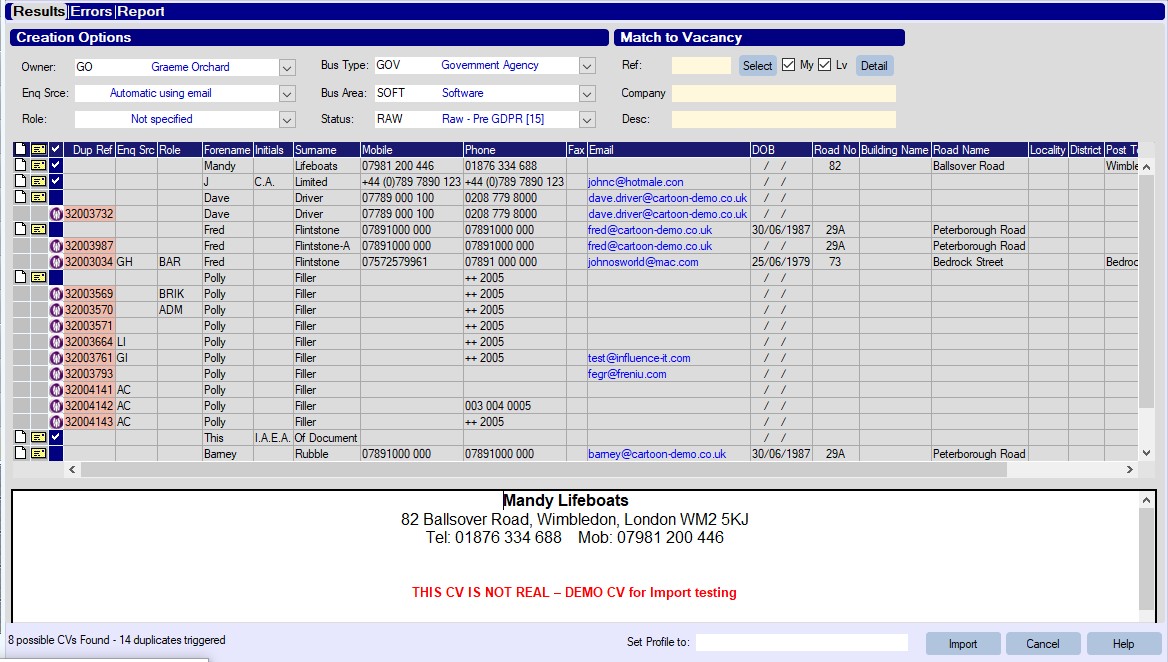
In the case of the un-ticked items the system believes it is a duplicate and no new candidate record will be created. You can force the system to create a new candidate by placing a tick next to that item.
To import the chosen information simply click [Import]
OPTIONS
If the system has spotted a duplicate candidate the system can operate in two different modes. The system parameter RECE,Flag(10) controls how the system behaves;
If RECE,Flag(10) is not set then the un-ticked CV will be ignored and no new candidate will be created.
If RECE,Flag(10) is set, then the un-ticked CV will not create a new candidate, but it will update the existing candidate record.
i) The text on the [CV&SKILLS] tab of the existing candidate will be updated with the content of the newly imported CV, and any additional skills will be added.
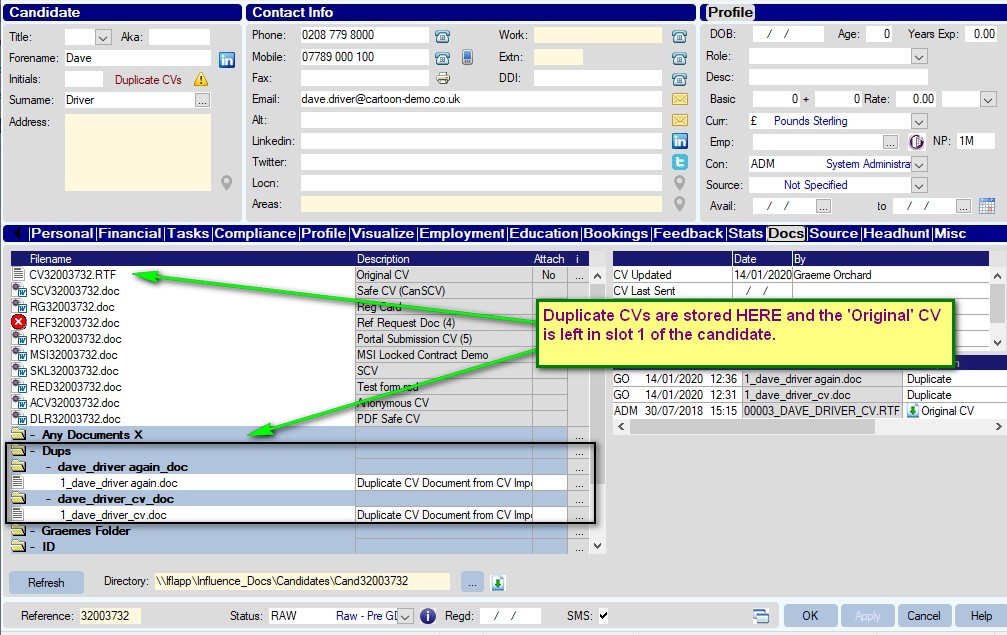
ii) A new folder will be created on the [DOCS] tab of the existing candidate called - Dups Any documents which the system has treated as a 'Duplicate CV' during the import process will be stored here.
Example
In the example below the system has spotted that the imported CV for Dave Driver appears to be a duplicate of an existing candidate.
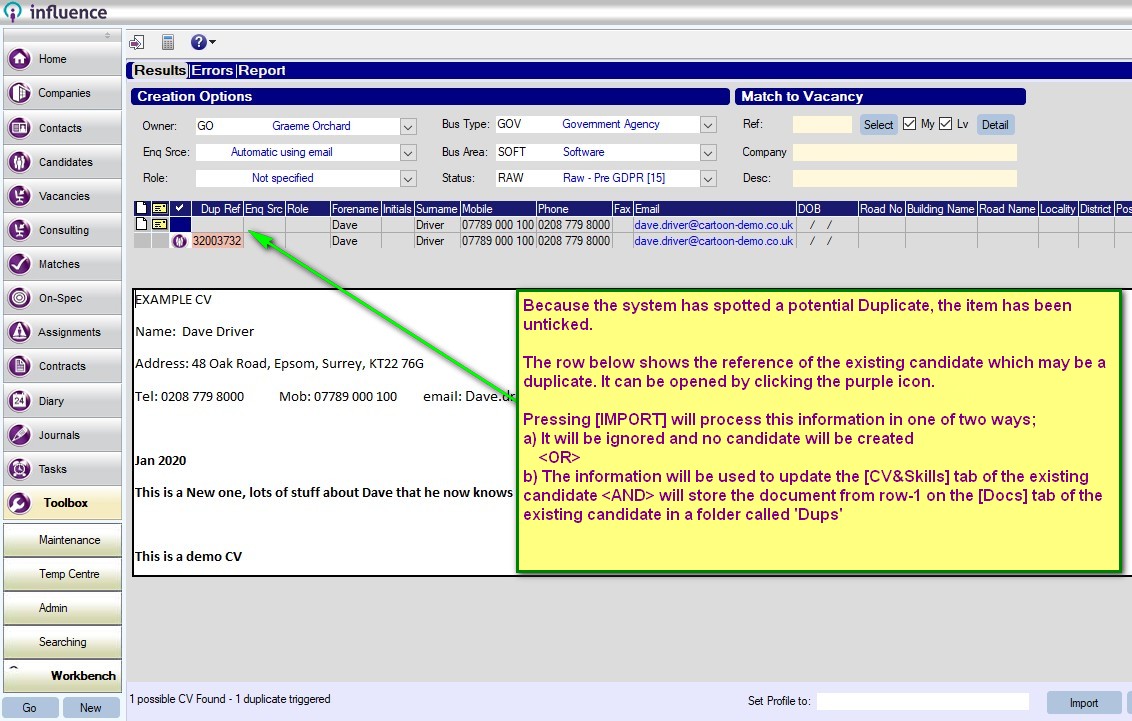
Clicking [Import] will process the information, which (in this case) will be used to update the existing record [Ref: 32003732 ]
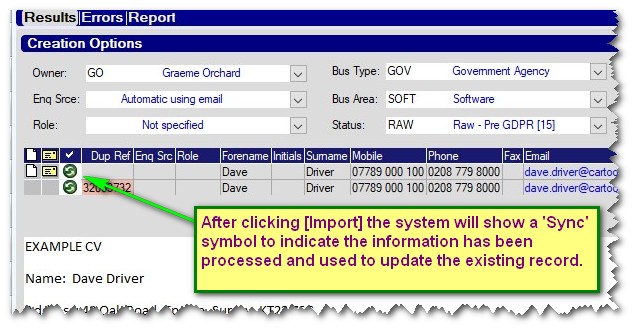
i) The system will update the text on the [CV & Skills Tab] (See below)

ii) The [Docs] tab of the candidate will store the imported CV in a folder called 'Dups'
Graeme Orchard
Comments